Search This Blog

Monday, July 13, 2015

Building a Moxon Vise with Benchcrafted Hardware

The end vise that I have on my work bench is a LeeValley twin screw which has about 15 3/4 inches between the two screws.  It works great, I have had it over 10 years and on two different benches.
However when you want to clamp something wider than 15 3/4 inches it is difficult to do.
Enter the Moxon vise, which seems to be very popular these days.  I don't need it all the time but when you need a wide vise it will sure fit the bill.

When I was in Iowa at the Handworks Tool Show, I purchased the Moxon Vise Kit from Benchcrafted.  I saved the shipping cost.


I debated a little while on just where I would put it.  I thought for awhile that I might build it into the front of my bench.  But decided not to because it would be in the way.   So, like many woodworkers,  I decided to make it removable and mount on top of the bench.  

Benchcrafted has plans on their website, so why not follow them.  They are pdf,  I downloaded and printed them.  They include a brief history and some building and finishing options. 


I decided on the 36 inch back with 32 inch front with 25 inch on center screws.  Their plans suggest
1 3/4 inch stock.  I have some soft maple in 8/4, so to begin I need to mill the stock to size.


Here are the 3 pieces needed.  The back is 5 1/2 x 36 inches.  The front is 5 5/8 x 32 inches,  the extra 1/8 is so the vise face catches on the workbench to help line it up when you use it.  The rear hold down is 2 x 24 inches.  All are 1 3/4 thick.


Then I had to layout where the 3/4 inch holes would be drilled and  1 1/4 inch holes for countersinking the nuts (countersink was 13/16 deep).  Drill the larger hole first.  Then the 3/4 inch hole is drilled using the point left by the forstner bit as the center.


3/4 inch forstner bit for the through hole  Hope they line up.


Using a bench chisel I flatten the sides of the hole to match the hex nut that needs to be countersunk.


Nice snug fit, just pop it in.


All set with this one, now for the other side.


I put the other nut and washer on the back with the countersunk nut on  the front and tighten them up.
I clamped the vise to the workbench and test fitted the front jaw to the screws.  It was a little tight, so I elongated the holes and then planed the top of the jaws flush.


Test spinning the heavy cast iron wheels.  They go on and spin really easy.


I glued on the rear holding piece with yellow glue and planed it flush on the bottom.  The holdfasts work great on this design.


Now I need to glue on the leather piece that they provide for the vise face.  They suggest contact cement.  I waited about 10 minutes for the glue to set and then put the two together.  I used a j-roller to apply the pressure and a utility knife to trim the excess leather.


All finished.  I could put a coat of Watco on it but natural is just fine with me.  There is 24 inches between the two screws, so it should be large enough for the widest panels.


Holdfasts work great on the back.


Quick little project for a great vise, I can store it out of the way when not in use.

Here is today's video:

Wednesday, July 8, 2015

Cherry Oxbow Chest - Applying Waterlox Tung Oil Finish - Step 15

Well I am in the home stretch now with the chest of drawers.  My favorite finish is to apply the Original Waterlox Tung Oil Finish.  It is not available everywhere and they have a low VOC product for sale in California which I have heard does not work as well as the original.  I purchase mine from Woodcraft.  I'll use about a pint and a half for this chest.

Waterlox soaks into the wood in the beginning but eventually starts to build up a film finish.  Depending on how porous the wood is it will take 6 to 8 coats to build this finish.   Each coat must wait 24 hours before applying the next coat.  I apply the finish with a rag by dipping it into a small bowl of finish.  

When I am done I pour the left over finish back into the can and fill the can with dust off spray or Bloxygen to chase the air out of the can.  Air in the can will start to thicken the finish.

Here is how the drawer fronts look after applying 2 coats.  You can see that most of the finish has soaked into the wood.


I sand between coats with 400 grit sandpaper.  It takes off the dust nubs and smooths the finish.  I wait 24 hours before I do the light sanding.  You have to be very careful not to sand through the finish and remove the dye stain.  I use extremely light pressure.  You don't have to sand between coats but it makes for a better finish.


Here you can see how the finish is built up with 3 coats.  Starting to get the finish look.


Seven Coats should be enough.


Well here it is with the seven coats.  Now it has to cure for at least a week before it is hard enough for final rub out with 0000 steel wool and paste wax.  I'll post again when it is completely finished.


Here is today's  video:

Wednesday, July 1, 2015

Cherry Oxbow Chest - Attaching the Hardware and Staining the Finish

Well it has been awhile since I have had a new post.  I have been working on the chest and started the finishing process.   However, since it is summer time and a honey-do list that needs attention I don't get as much time in the shop as I do in the winter.

I ordered hardware from Horton Brasses and I thought I had the right size drop handles for the chest. As it turned out they were too small.  So I ordered larger and returned the original set.  Horton is easy to work with.

The plan for mounting them was to have the drop handle in the center of each of the drawers.  I also ordered keyhole escutcheons.   I usually mount the hardware before finishing because I do not want to disturb the finish with drilling and fitting after it is completed.

Here is the chest with the hardware attached.  Looks good to me.  I did have to bend the bales a little because of the curve on the drawer front.

  
I then took the hardware off and put it away for later.  I still had some small tasks to do, like chop out a lock striker mortise.  Each drawer has a lock so it needs to have some place for the lock to go.
I turned the chest upside down to work on the underside of the drawer blades.  I used short chisels and a mallet to chop them out.


I drilled holes in the drawer blades for screws to attach the top.  But I could not use any power tools to make the countersink holes.


So I made a handle for the countersink bit and routed them by hand.


I attached the top with 1 1/4 inch screws and then took it off.


   I had already sanded the chest to 180 as I was assembling it.  So now to sand at 220 was not a big deal and I hate to sand.

I knew that the cherry would blotch if I hand applied a water based dye to it.  There are some things you can do to reduce the blotching.  Spray the dye, this works but on a piece like this I would have to mask a lot to keep the spray away from where I don't want it.

I tried using a conditioner of shellac, I used a 1lb cut of shellac, let it dry and then sanded it back.  It did not block too well.

I tried Charles Neil's Pre-Color Conditioner and it worked really well.  So that is what I used.  I practiced on cutouts from the back of the drawers.  The top piece is full strength dye and the lower is reduced by 50%.


I applied the conditioner with a rag and let it dry.  Then sanded it lightly with 320 grit sand paper to get it smooth again.  The conditioner raises the grain.


Then I applied the dye with a rag as even as I could.  I let it dry and then sanded with 400 grit sand paper to get it baby butt smooth.  Here is the top after it had been dyed and sanded.


Next it did the drawer fronts.


Lastly, I did the chest carcass. But I still need to sand it at this point.


 Here it is all assembled.  I have to do a little more sanding but then I am going to apply the Original Waterlox Tung Oil finish.


Here is today video:

Sunday, June 14, 2015

Cherry Oxbow Chest - Drawer Locks, Top and Back - Build Complete

I am getting to the completion of the cabinet, there are not too many steps remaining to complete the building process.

Now that the drawers are complete and planed to fit smoothly, I installed drawer stops.  I used small pieces of wood and glued them to the front on each side of the curve.   This stops the drawer just were I want them.   If I put the drawer stops in the back, then the drawer face can move in and out depending on the weather since they shrink in the winter.


 In the piece that I am copying, there are drawer locks in each drawer.  A lot of reproductions don't put in the locks but put on the escutcheon plates.  This time I want to be more correct and put the locks in all four drawers.

I purchased half mortise locks from Horton Brasses.  Traced the lock dimensions on to the back of the drawer and started to chop the mortise.  You can see that I am still using the cut offs to support the curved drawers so I can work on them.


My router plane comes in handy here to make a nice flat bottomed mortise.


I made the inside mortise first, then work on the outside mortise.  The line on the top of the drawer is the center line, you will want the key to be in the center of the drawer.  The mortise for the lock is offset because the pin for the key is not in the center of the lock.  


I drilled a small hole from the back where the key pin is, so that the center of the key hole will be marked on the drawer front.


With the two mortises cut the lock fits in pretty well, but because of the curve I need to do a little extra paring to make it fit tight.  You can see how the lock is offset from center because of where the key hole is located.


Now I drilled a larger hole in the front from where the small pilot hole was drilled.  The lock pin is in the center of the hole.  I mark on the drawer front where the key shape is to be extended. 


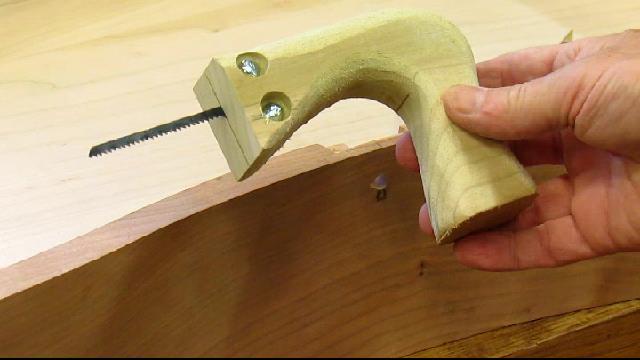
I don't have a key hole saw, so I made a simple handle and used a jig saw blade to work in the small opening.  It cuts on the pull stroke.


After completing the first lock mortise and key hole, I made cardboard templates to be used on the next three.  It made it much easier to setup and cut.  There was one for the inner mortise and one for the outer mortise.


Now with the lock mortises out of the way, I turned my attention to the top.  I had resawed an 8/4 piece of cherry that was 12 inches wide and glued it up.  This made the 21 3/4 that I needed for the top.  Made a nice book-matched grain pattern.


I cut out the front of the top to match the curves of the drawer fronts using the pattern that I had for the drawers.  Then I added an ogee shape to the underside of the the top.  This is the first time I have put a molded edge on the underside of a top.  The piece that I am copying is pictured on the wall behind and I am following it.

I made some half lap pine boards for the back.  These fit into the 1/2 inch groove that I made around the inside of the case.  I used small nails to hold them in place.


I left small gaps between each of the pieces to allow of the expansion of the boards.


All done with the build.  Now I need to attach the hardware, then remove it to begin the finishing.

Here is today's video:

Saturday, June 6, 2015

Cherry Oxbow Chest - Making the Drawer Bottoms - Step 12

At this point I could go to the big box store and buy some 1/4 inch plywood and cut it to fit in the drawer bottoms, but that would not be period like....  When I first started making furniture that is what I did based on the fact that if period furniture makers had plywood they would have used it.

Today, I make solid wood bottoms, it takes a little longer but a solid panel bottom is what people expect.  The bottoms are often made of pine but I don't have enough to make all of them and obtaining clear pine is not easy or cheap.   Soft maple is inexpensive and I always have plenty on hand.

The drawer bottoms are 32 1/2 x 18 1/2 inches with the grain running parallel to the front.  This allows for the expansion of the bottom out the back of the drawer.  I decided to make the drawer bottoms 7/16 inch thick so I can resaw the maple and not get a lot of waste.


Each of the boards is about 8 inches wide, so it will take 3 boards to glue up to get the required width.


I try to keep them as flat as possible when I glue them up by using culls.

After the glue dries I'll use my wide belt sander to flatten and clean them up.

I traced the curve from the inside of the drawer front on to the drawer bottom and then cut out  the pattern on the band saw.  I cleaned up the edge after sawing with the spindle sander.


Next I have to add a bevel to the bottom of the panel so that it will fit into the 1/4 inch grove in the sides and the front.  The straight edges could be done with a panel raising plane but the curved edges need to be done another way.   I have a large router bit that is a horizontal panel raiser.  I use it at a low speed and make several light passes to get it to the thickness that I want.  It does a nice job on the curved front.  


Below is the finished bevel.  I test fit it into the grove to make sure it is thin enough.  


For the straight groves on the drawer sides, I use my plow plane.  I could have used a dado blade or router bit to cut the grooves but I like to use hand planes too and they are quieter.  There are 8 sides to do.


For the curved drawer fronts, I go back to the router with a 1/4  inch slot clutter.  It makes quick work of the curved slot.


I cut off a 1/2 inch on the drawer backs to make an opening to slide in the drawer bottom.  If everything is correct it slips right in.


Look's like a good snug fit.  The back is slightly proud but that is the way it was done in the 18th century.


The bottom bevel fits well into the groove.  I will nail the bottom to the back with a couple of small brads after the drawer is glued together.


Now I have to glue up the drawers and make the chest top.  I ordered the hardware yesterday so it should be here very soon.  Once the top is made, I need to make a back and the chest construction will be complete.   Then on to finishing.

Here is today's video: