I spent the last weekend March 28 and 29 with the Great Lakes Chapter of the Society of American Period Furniture Makers (SAPFM) doing an exhibition at the Detroit Institute of Art (DIA). This is the second time that I contributed and the third time the museum had invited us. I had a great time.
We had about 20 of the members of the chapter set up workstations and furniture in the great hall of the DIA.
Each of the participants demonstrated one of the woodworking techniques used in making the furniture pieces that we displayed.
Our goal was to educated both young and old in the furniture style and woodworking techniques. Once we got setup they opened at 10 am things got very busy.
We had about 1000 people come through in the two days. We also recruited new members and may have picked up a few.
Below we are setting up of the demonstrations. Many of our members were in period dress. Some good looking guys.
We have some very talented woodworkers in our chapter. Below is Ed Stuckey's gorgeous federal table.
Steve Lash's Arm Chair and Dale Asherman's progress on copying Steve's chair.
This beautiful tall clock made by Bill Wayland.
Of course my Goddard card table.
Here are some of the work stations. Carving the ball and claw. Notice the treadle lathe in the background. There were no power tools present.
Hollows and rounds, wooden molding planes.
Dan Reahard was carving the details on his tall clock. Such beautiful carving, I am jealous.
I am trying to gain the interest of a young potential woodworker!
It was a great weekend. Here is a short video of the show.
I have been busy with all kinds of projects, so I have not been able to devote everyday to the construction of the Oxbow Chest.
I did get a couple of days to work on it this week, so here is the progress that I made.
I made the drawer blade for just under the top, along with a straight 4 inch piece in the back to hold the case together. The drawer blade will need to have the cockbeading added but I'll do that a little later when I do all of them.
So this is how the case looks now. I need to make the rest of the drawer blades and then add the dovetail slots to the sides to hold the case together.
Below I am using my story stick to mark out where the drawer blades and drawer runner slots need to be located. It is pretty easy to be consistent with the story stick since the markings are there and can be transferred to both sides.
I cut out the drawer blades using the templates that I had prepared earlier for the chest bottom. I used a jig saw to cut out the shape leaving about a 1/32 to 1/16 inch extra. Then I used the router with a flush trim bit to match the profile.
Then I used a beading bit in the router table to put a 3/16" cockbead on the edges of the drawer blades.
Putting the bead on each edge of the three center blades as well as one bead on the upper and lower blades, still leaves the material behind the bead to be cleaned out.
I used a slot cutter or fly cutter with the proper bearing to remove the rest of the material. The cutter width did not match the remaining material to be removed so I just turned over the blade and cut the rest.
Below are the five blades with the cockbeading and the material removed behind the bead. I had left an extra 1/8 inch on the ends knowing that I would not leave a clean edge using the router bits.
So I gang sawed off 1/8 inch to remove all the nasty edges. This also insured that the ends were all the same length. I used a hand saw to remove the 1/8 inch.
I need to put the dovetail slots into the case sides for the drawer blades and the slots for the drawer runners. I used my router jig I had made years ago which I clamp to the work piece and run the router through. The opening is exactly the size of the router base so there is no movement of the router from side to side.
Once I get the router jig lined up, I cut the dovetail slot and the drawer runner slot with multiple routers.
I know I could do all of this with hand tools, but since I have the power tools it is easier for me.
After I have cut the dovetail slots in the sides and the drawer runner slots into the case sides, I put matching dovetails on the drawer blade ends using the same bit that I used to cut the slots. By standing the blades on end and running them over the router table, I make matching dovetails on the drawerblades.
It was hard to clamp them since they had curved fronts.
Before I would assemble the case I need to put a rabbet on the back edge of the case all the way around. I used my fillister plane to cut a 1/2 x 3/8 inch rabbet on the back of the case.
It didn't take a lot of fitting to get the dovetails on the the drawer blades to fit the sides, so here it is all assembled.
Looking pretty good at this point.
Here is a different angle. The blades all match up nice in the front. The dovetails in the sides will be hidden by the quarter columns.
So now I need to add the drawer runners and the work on the quarter columns and the cockbeading.
That will be coming up in the next installment.
We traveled to Middlefield Ohio last week to Byler's Kiln Drying Lumber. They have a nice setup there with all the lumber in vertical bins. They had a good supply of figured and plain cherry in a number of thicknesses.
Doug Moulder and I sorted through the bins and found some good looking boards. One plus for Byler's is they skip plane everything so you can see what the grain and color looks like. The minus is that the 4/4 is 15/16 of an inch. This is usually not a problem.
Here is a 12 foot 8/4 board 16 inches wide that I purchased. We cut it in half. I will be using this for the drawer fronts and bracket feet.
I started with the chest sides. I purchased a 10 foot 4/4 board that was about 10 inches wide. The sides are 17 1/2 inches wide and 26 1/4 inches high. So I should be able to get both sides from this one board.
To help with measuring, instead of going back to the drawings all the time, I made a story stick.
The side dimensions are marked out on the stick and it is used to measure and layout the drawers, the drawer runners, etc. Using my story stick, I cut the board into the four pieces that I need for the sides. Then I jointed the edges. I did not run them through the planer since they were already fairly flat.
Then I glued up the panels.
After the glue dried, I ran the panels through my wide belt sander to flatten them and to thickness them to 7/8 inch. I made this home built wide belt sander about 10 years ago. It has a 22 inch drum. Works great.
Two nice looking flat cherry chest sides.
Now I need to trim them to the exact dimensions and square up the ends. I am using my crosscut sled here and hold the panel in place with a couple of clamps.
Now to layout the dovetails. I used my marking gauge and dividers to layout the tails. They are about 2 inches wide. It was arbitrary. The bevel gauge is set to 14 degrees. These dovetails are not seen since they are in the bottom of the chest. They look passable.
Now to saw and chop out the tails from the bottom. I sped up the process in the video. Wish I could cut them that fast.
Once they were cut out I matched them and traced them on to the cherry sides. Then sawed and chopped out the pins.
Chopping out the pins from the cherry sides. Cherry is a lot harder wood than the poplar on the bottom board and they are 7/8 inch thick. I honed my chisel twice while I was chopping them out.
Fitting the sides to the bottom. Nice tight fit.
All done with both sides.
Now I need to make a drawer blade which will be dovetailed at the top to hold the sides together. I made templates for the drawer fronts and blades in the previous blog entry, so I was all set to go.
I put two 5/8 inch dovetails on the end of the blade.
Now I'll trace the dovetails on to the side and cut them out. I will repeat the process in the back of the case with a straight piece of poplar since it will not be seen.
This pretty much completes the outside of the case. Next will be to put in the rest of the drawer blades and drawer runners.
Today I started a new project. An Oxbow Chest of Drawers from around 1760 in Connecticut. The research that I did showed quite a few which had similar designs and most were made from cherry. Some with quarter columns, most without. I picked a combination of several chests for my own design.
For the most part it will look like this.
It has quarter columns in the corners, curved bracket feet and oxbow style drawer front. If I can get cherry thick enough I will cut them from one piece, otherwise they will have to be veneer fronts.
The first thing that I did was make full size drawings. This helps me think through all of the construction techniques that I will have to use in the construction. Some of the more challenging steps will be the serpentine molding on the front, curved bracket feet, curved drawer fronts, cockbeading on the drawer blades and the quarter columns.
I was able to get a lot of dimensions from this old book with a chest of drawers similar to the one I am going to build.
From the full size drawings I made templates for the front curve. This can be used for the drawer blades and fronts, also the chest bottom.
I start by flattening 2 poplar boards about 12 inches wide. Once I get one side flat with my hand planes, I then use the planer to flatten the other side. Then I joint the edges so I can glue up the panel.
Below I am checking the edges to see that it is a good tight fit.
For most woodworkers gluing up panels is second nature. When working with solid wood furniture you do it almost every time.
Once the panel is dry, I scrape off the excess and finish milling to the final thickness of 13/16 inches.
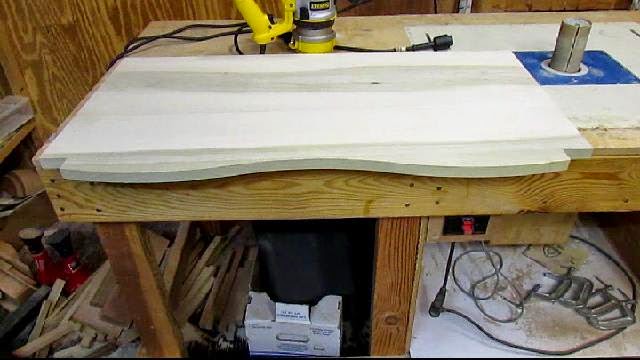
Here is where the template is handy for tracing the pattern on to the chest bottom.
Then I used a jig saw to cut out the pattern, leaving about 1/16 inch extra to trim off.
Then I will use the pattern again to finish trim the edge with a flush trim bit in my router. I makes a nice edge. I could have used an oscillating spindle sander to trim but this is quicker.
There you have it, the bottom is made.
The sides will be dovetailed to the bottom, so I need to go get some good looking cherry lumber.
Tomorrow we are going to take a trip to a new supplier in Middlefield Ohio, about an hour from my shop. He says he has some good 8/4 figured cherry for the drawer fronts. We will soon find out.