Search This Blog

Tuesday, July 26, 2016

Chapin High Chest of Drawers - Cut out Shapes & Drawer Runners - Step 4

The next steps for me after dry fitting the lower case where to refine the shapes on the apron and sides. This is the pattern for the sides. I was able to get this when I studied the piece at the Yale Furniture Study.   I cut it out with a jig saw and used a spindle sander to clean it up.


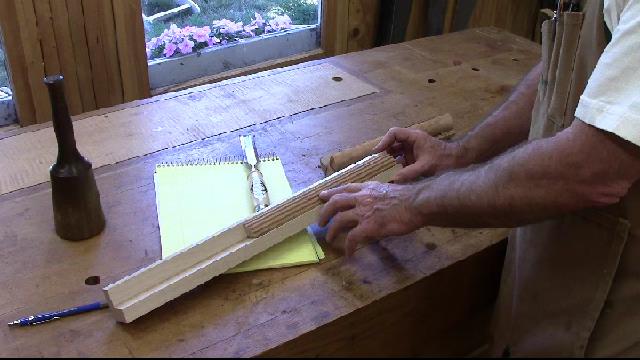
The apron on this piece is identical to an apron I made for another Chapin piece Desk on Frame about 5 years ago.
To me it was interesting that the two were identical.


I cut it out with a jig saw and cleaned it up with a spindle sander.  But I could not get into the tight curves with that sander.


So I cleaned it up with files where I couldn't reach with the spindle sander.


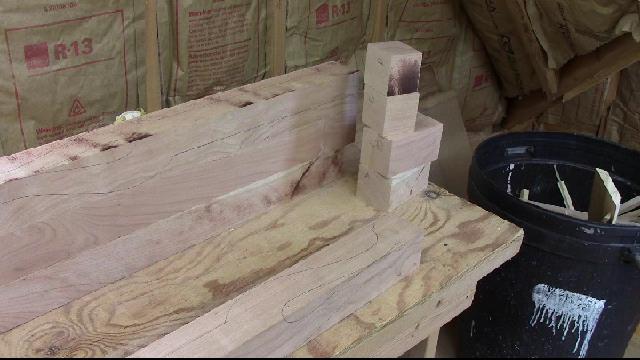
Next I worked on cutting out the legs where the quarter columns will sit.  This is usually done on a table saw these days.  But I don't like that process and that it cuts out the top corner block.


I use a biscuit jointer as a plunge saw to cut two sides and then chop out the rest.


This way I leave the block in the top of the leg but I have some work to do with the chisel to  chop out the remaining.

I cut the end line with a hand saw

Then chop out the waste with a chisel.


I check the fit with the test quarter column I made earlier in the project. The base and capital would be below and above the quarter column.


I reassembled the case to see how it looks and then to decide how to install the drawer runners.


I decided to mortise the drawer runners front and back rather than build a frame.  The only complication of doing it this way is the final glue up is more complicated.

The center drawer has a complicated runner since the drawers are offset, it takes two pieces and a complex shape. I glued the two together and mortised front and back.


Locating the mortise on the front.

Chopping out the mortise on the back.


The drawer runners are made and fitted to the first row of drawers.  The ones on the out side edges are not that complex, just a runner and a guide.  I have to make sure they are flush with the opening and straight to the back.


I still have to make the drawer runners for the large drawer and add kickers for the lower drawers.
So here they are, the two in the center are kickers for the lower drawers.
I also made support blocks for the upper chest but I will not attach them until I glue up the case.


Construction of the lower case is complete, now I have to shape the legs and carve the ball and claw feet.

Here is today's video:

Wednesday, July 20, 2016

Chapin High Chest of Drawers - Building & Dry Fitting Lower Case Step 3

It has been very hot here in Lakewood Ohio and my shop is not air conditioned.  So, I have to sweat it out. The lumber is probably swelled as much as it can be, which means that it will shrink at some point when it gets cooler and the humidity goes down.

The cabriolet legs are still 3 inches square at the top of the leg posts.  I have marked out where I want the mortises to be.  I am going to make 5/16 mortises 3/4 of an inch deep.


I am using my hollow chisel mortiser which will make quick work out of the task since all of the mortises are the same distance from an edge.  The front, sides and back are all 7/8 inches thick.


Here are all the mortises in the legs.  Now I have to cut off the excess stock to get to 1 3/4 inches square.


There are many ways to accomplish this, I like to use my bandsaw.  It cuts straight after setting it up correctly and the 5/8 inch blade does not leave a very rough finish.  Although there is still some clean up.
If you use a table saw be careful to stop before you get to the curved leg.  Then finish with a hand saw or bandsaw.

Here are the four legs after they have been trimmed to 1 3/4 square.


These are the drawer dividers for the lower case. The top one is the drawer divider for the large drawer. The lower board is the top rail which holds the case together with a dovetail.


Here I am cutting the dovetail in the rail. This is very typical of 18th century construction to use a dovetail or double tenon on the top rail to help hold the case together.


Here is am using my low angle block plane to remove excess from the tenons on the apron.  I always cut them thick so I can fit them tight to the mortises.


Looks like a good tight fit.


Chopping out the matching dovetail opening in the top of the right front post. Very similar to cutting out dovetails on a half blind drawer front.


Tracing the pattern on the front apron.

I cut out an opening for the larger center drawer and then mortised and tenoned columns to separate it from the smaller left and right drawer.


All assembled, the openings are square and the rails are solid.


Next I am going to make the back of the case from pine. I glued up 3 pieces of pine to make
34 7/8 x 17 x 7/8 inch back.  After gluing up the panel I am using my crosscut sled to square up the panel.


Here is the front and back dry fitted.  Now for the sides.

The sides need to be 17 inches wide with the gain running front to back.  I have purchased a matched set of cherry boards which includes one that is 20 inches wide by 14 feet long.  I hope to get the lower and upper case sides from this board. I cut 2 pieces from this board for the sides.
Then flattened them with hand planes.


I used a dado set to put a 3/4 x 5/16 tenon all across the sides.  Then using my story stick I marked out where the mortises would be and cut the tenons to fit.


You can see the tenons on the side here as I dry fit the sides to the front and back.  Nice looking cherry stock.   The sides which are one piece will probably crack at some point because the grain is horizontal and the columns have vertical grain.  Very common in 18th century furniture.


All done dry fitting the lower case. Next will be to cut out the patterns on the apron and sides. Cut out the corners for the quarter columns. Finish the cabriolet legs and carve the ball and claw feet.  That should be in the next video.


Here is today's video:

Friday, July 15, 2016

Chapin High Chest of Drawers - Test Quarter Columns & Cabriolet Legs

Having completed my drawings and planning for the high chest, I decided to start with the cabriolet legs.

I need four 32 inches long with the leg portion 15 inches and the post portion 17 inches.  The post contains a quarter column with four flutes.

I did measure the opening and column when I was at Yale, but when I made a sample quarter column it looked too small to me and I started to doubt my measurements.  So I decided to make a mock up.

 I cut a piece of maple to 1 3/4 square and then put a 1 x 1 opening in it.  This would be like the column over the cabriolet leg.


Then I glued up four 7/8 inch piece of scrap cherry with craft paper and hyde glue. After it dried I turned it round on the lathe.
I split it apart with a chisel, usually this is easy but it was real sticky.


Had to scrape the sticky paper off of the quarter column.


I fit the quarter column into the opening in the wood.  It looked ok but I still wanted to see how it would look when I added the flutes.


So I glued it back together and put the cylinder back in the lathe and put four flutes in one quarter column.  I will show this in detail later when I actually make them or you can look at an old project when I made them before cherry-oxbow-chest-making-quarter.html


Here it is with the flutes and they look ok. So I have verified the dimensions for the columns. I guess I am ready to prepare the stock for the legs.


I have a 10 foot long 12/4 cherry board which is 7 inches wide.  I will get two legs from each cut off.  I add 3 inches to the 32 to allow extra stock for the knee blocks.


The down side to this nice cherry board is that it has quarter sawn grain.  This is not ideal for making cabriolet.  Normally, you want flat sawn boards where the grain runs out on a corner.
But this is all that I have so I will have to look at the grain after they are cut out.

Using a hand saw to cut up the 35 inch billets.

Squaring up the stock on the jointer to get two good edges.

Plane and rip the boards into 3 inch square legs.  Trace the template on the leg watching where the grain will be and then chop of the extra for the knee blocks.

Blew a tire off the bandsaw just as I started to saw them out.  Off to Woodcraft to pick up a new tire.

Bandsawing out the leg pattern. I do one side and then tape it back together and then do the other side.

Now I am able to see just how the grain looks on all four sides.  I actually did six legs then picked the best four.

I now know how the legs will be positioned on the chest I can put in the mortises while the top column is still square.  Mortising will be in the next video.

Here is today's video: