Search This Blog

Friday, December 26, 2014

Practice Traditional Finish Techniques - Learning Much

I have completed sanding the entire table to 220 grit.  At this point I would normally wet the piece down to raise the grain, sand off the fuzzies,  stain using a water based aniline dye and finish using tung oil or shellac.

But....... Tim Garland, a professional furniture restorer in the UK made other suggestions.  Tim offered to finish  the piece but he is located in the UK, which is a bit far to ship the table.  He asked how I was going to finish the table and then politely suggested that there may be better processes which he provided.    The methods he described could produce a more period like finish with chemical stains, shellac and colored waxes.

I was game to learn new finishing processes.  I have studied processes and classes by Jeff Jewitt and Bob Flexner but had never come across these techniques.  Tim suggested reading Sam Allen's Classic Finishing Techniques.  This is an excellent book on period finishing.

So here we go.  I started by sanding the test board which was cut off from the table top to 220 grit.
Then with warm water, I used a rag to wet the surface.  I let it dry over night, I don't think you would have to wait that long but it was the end of the day for me.


The next day I sanded it with 320 grit sand paper and vacuumed off the dust.  I lightly sanded just knocking off the fuzzy grain.  I used a rubber sanding block and did it by hand.


 Then I did it again by re-wetting the surface with warm water, waited until it dried and then sanded it off again.


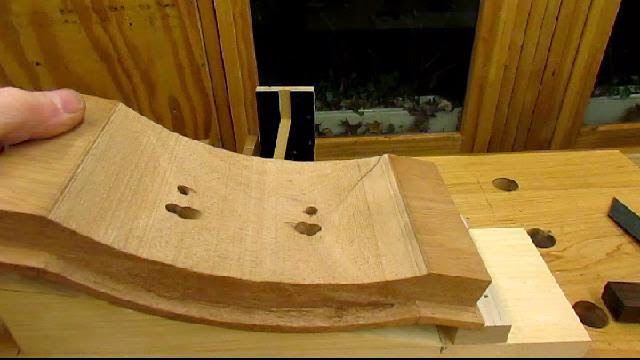
I vacuumed up the dust.  Now I was ready to apply the chemical stain.   In this case, it was Potassium Dichromate  crystals dissolved in water.  I used 4 oz. of crystals in 24 oz.  hot water.   While the solution was still warm, I used a rag to wipe on the solution.  I used rubber gloves and a mask.


It looked good going on and the picture above is about 5 minutes after it had been applied.  I expected it to turn dark and look similar to the picture.

As it turned out it turned a powdery yellow brown and it looked terrible.   I emailed Tim figuring I had done something wrong.   But as it turns out everything was ok.  I sanded off the yellow dust with a white scotch plastic abrasive pad.  Similar to 0000 steel wool.


This is what it looked like after that.  A dull yellow brown.  You can see a couple of spot where I dripped some water drops from my gloves.  But that is why I practice.


If I wanted it darker I could have applied it again.  But I decided to go to the next step which is to seal it with a 1 to 2 lb. cut of dark shellac.    I don't brush shellac, I spray it.  So, I sprayed two coats of 1 1/2 lb dark shellac.


Much Better.  :-)


Next steps are to fill with a hard colored wax.  That will be in the next post.

Here is today's video:


Sunday, December 21, 2014

Sanding and Curved Drawer Pulls

Not too much going on with all the holiday dinners and shopping.   I have been sanding the top and drawer fronts so that all of the table will be at 220 grit before finishing.

Soon my finishing supplies will be delivered and I will put together some videos on a new finishing process that I am learning.   Timothy Garland, a furniture restorer in Lincolnshire UK is teaching me the traditional methods that he uses.  These are the methods and materials that were used in the 18th century.  It is really interesting for me and I am learning quite a bit.

Below I am hand sanding the molding and curved drawer fronts but I machine sand the flat surfaces.   I wear a dust mask and vacuum up the dust frequently.


I have since finished sanding everything to 180 now.  So only one more pass to get to 220.


Before I can begin to finish the table I have to select the drawer pulls, mount them and then take them off.  
I purchased some awhile ago at a bargain sale  that I thought might work.  But I think it was a false bargain.  It turns out that they are brass coated steel.


I thought I would mount one anyway on a practice drawer front. The size and color are nice but the quality is not there so I have ordered new ones from Ball & Ball.


You can see hear that I bent the escutcheon plate to match the curve of the front.  Then I guessed the angle for the drill and drilled the holes.   Well that did not work.  The angle was way off, so I widened the holes so I could test mount the pull.   But that won't work when I am doing this on the good drawer fronts.


So I measured the angle and made a jig to hold the drawer front so I could drill them perpendicular in the drill press.


The second set of holes in the front were drilled using the jig.  I worked just fine.  But I need to make another for the concave drawer front.


This is a jig for the table saw I made a number of years ago  to cut the wedges at the 15 degree angel
.

Here is today's video:


Monday, December 15, 2014

Finished Construction of the Dressing Table

Once the knee blocks had been glued to sides of the cabriolet knees, it was time to pare them off.  I used a sharp chisel.  I tested it my shaving the back of my hand and it worked well.  Then I touched them up with 180 grit sand paper.  I put them on all four sides of the dressing table.
You can see the front two in the picture below.


I glued on the drop finials.  I pre-sanded them to 180 grit.


Then I attached the top.  I drilled holes in top front drawer blade so I could put 3 screws along the front.  I did not leave room for them to move.  Then in the back kicker rail I put 3 elongated slots and centered the screws.  This will allow for expansion and contraction of the top board.
I also put two 1/4 by 1 inch slots on the inside of the sides and installed table buttons


Here it is all assembled.  Done with the construction phase. Now for the finishing.


I took the top off and started to sand it.  The large part of the top I did with an orbital sander but the molding must be done by hand.


I am going to sand everything to 220 grit before I start the finishing.  So you won't see too much progress for a little while.   I also ordered some finishing supplies which should be here in a couple of days.


While I am waiting, I took a trip to my friend Doug Moulder's shop to see how he was doing  in constructing a Pinwheel Cabinet from the book Furniture in the Southern Style.   Here he is cutting out the pinwheel inlay on the face of the door.
He is taking a lot of great pictures of the build.  Maybe he will let me do an blog story on the cabinet when he is done.


 We should chip in and buy him some better light fixtures. :-)


I will keep you posted. Have a great day!

Monday, December 8, 2014

Making the Knee Blocks - Cutout and Shaping

It is time to start on the knee blocks.  This is the last step in the construction of the dressing table.
After this it will be all sanding and finishing.

To start with I take a look at the pictures that I have of the two dressing tables.


You can see how they fit under the apron and curve toward the back.  I want to reproduce this shape.
 I cut out a couple of templates from cardboard.  The third one is the one that I like.


I had saved a couple of inches of wood from the tops of the cabriolet legs when I was cutting the 12/4 stock to length for the legs.
This is so I can match the grain.  I have traced the pattern on the front of the block.


Now to trace the pattern on the side.


With my bandsaw I cut out the patterns. First the side. Then I tape it back together and saw the front pattern.
Here it is roughed out after the bandsaw cuts.  It needs to be rounded over and smoothed


I put a long screw in the back to hold it so I can clamp it in my vise.  Then I use my Nickelson #50 rasp and some files to round it over.  The smoothing is done with files and sandpaper.


Here is the first one. I leave it a little proud of the knee so that I can do final shaping after it is glued on.


Now I repeat the process for the other side.  Using the first one as a model.


All done with the second one.  The front two are the hardest because of the apron.  The remaining six will be easier now that I have the models.  I finish them tomorrow and then glue them on.
Once the glue is dry I will use a sharp chisel to pare the blocks to match the knee.
Then the finishing will begin.


Here is today's video:


Friday, December 5, 2014

Making the Table Top - Hand Planing is Work for Me

It is time to make the table top.  I had selected a portion of a large board that was used for the sides and various parts of the table.  So I could see the color and grain,  I had partially surfaced the board back then.  Well, since then it has cupped quit a bit.  So I need to take quite a bit off to get it flat.  Here you can see the board after the first pass.


The middle still is rough, so I have quite a bit to take off.
Piles of shaving after a few passes but I am getting pretty close to this side being flattened.


Here I am making the last pass before I check it for flatness.


Looks good at this point. Now for the other side.


Using a #4 smoothing plane to get a better finish on both sides.


I am using my cross cut sled here to trim the board to 33 1/2 inches.  The board is 21 3/4 wide and it just fit inside my sled.  I guess that I intended the sled to hold a 22 inch board.


After I trimmed the board, I traced the curves with my template that I had used with the apron.  I used my jig saw to cut out the shapes.  The using a spokeshave and sanding block I smoothed the edges.  So, I all set to route the molded edges.


I have to do a little maintenance in the shop this morning.  It seems that over the years the mdf board that the router is mounted in has sagged about 1/16 inch.  This is not going to work with this 33 1/2 inch top.  The edge will not be the same all along the top.   So I take the quick way out and use floor jacks to jack up the center of the top so that it is level with the sides.  Now the molding will be even across the board.


Here we have the top after I have made several passes on the three routers that I had set up and tested in earlier posts.


Now I have to carve the four baby butt corners that I have practiced in that last post.


Much easier now that I have a good one to look at while I am carving.


All done with the top.  It looks good.  


So now I have to make the knee blocks and the construction will be completed.  Then I can call my finisher.  Oh wait, I am the finisher!

Here is today's video: