Now that the drawers are complete and planed to fit smoothly, I installed drawer stops. I used small pieces of wood and glued them to the front on each side of the curve. This stops the drawer just were I want them. If I put the drawer stops in the back, then the drawer face can move in and out depending on the weather since they shrink in the winter.

In the piece that I am copying, there are drawer locks in each drawer. A lot of reproductions don't put in the locks but put on the escutcheon plates. This time I want to be more correct and put the locks in all four drawers.
I purchased half mortise locks from Horton Brasses. Traced the lock dimensions on to the back of the drawer and started to chop the mortise. You can see that I am still using the cut offs to support the curved drawers so I can work on them.

My router plane comes in handy here to make a nice flat bottomed mortise.

I made the inside mortise first, then work on the outside mortise. The line on the top of the drawer is the center line, you will want the key to be in the center of the drawer. The mortise for the lock is offset because the pin for the key is not in the center of the lock.

I drilled a small hole from the back where the key pin is, so that the center of the key hole will be marked on the drawer front.

With the two mortises cut the lock fits in pretty well, but because of the curve I need to do a little extra paring to make it fit tight. You can see how the lock is offset from center because of where the key hole is located.

Now I drilled a larger hole in the front from where the small pilot hole was drilled. The lock pin is in the center of the hole. I mark on the drawer front where the key shape is to be extended.

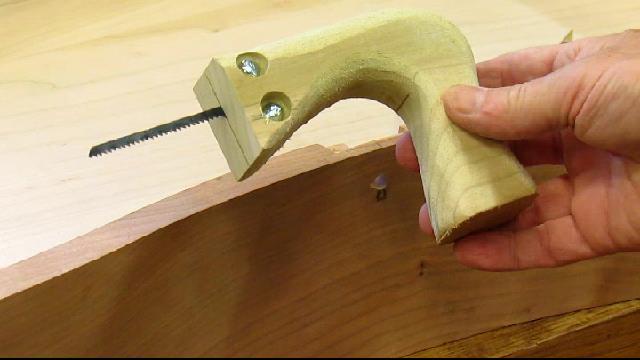
I don't have a key hole saw, so I made a simple handle and used a jig saw blade to work in the small opening. It cuts on the pull stroke.

After completing the first lock mortise and key hole, I made cardboard templates to be used on the next three. It made it much easier to setup and cut. There was one for the inner mortise and one for the outer mortise.

Now with the lock mortises out of the way, I turned my attention to the top. I had resawed an 8/4 piece of cherry that was 12 inches wide and glued it up. This made the 21 3/4 that I needed for the top. Made a nice book-matched grain pattern.

I cut out the front of the top to match the curves of the drawer fronts using the pattern that I had for the drawers. Then I added an ogee shape to the underside of the the top. This is the first time I have put a molded edge on the underside of a top. The piece that I am copying is pictured on the wall behind and I am following it.
I made some half lap pine boards for the back. These fit into the 1/2 inch groove that I made around the inside of the case. I used small nails to hold them in place.


I left small gaps between each of the pieces to allow of the expansion of the boards.

All done with the build. Now I need to attach the hardware, then remove it to begin the finishing.
Here is today's video:
No comments:
Post a Comment