Search This Blog

Monday, May 29, 2017

Curved Blockfront Lowboy - Drawer Blades & Apron Step 3

I am starting on the apron and drawer dividers (drawer blades).  The most complicated is the apron since it is curved in two directions. Across the front to create the blocking and across the bottom which mirrors the front curves.

I took the drawing off the wall to make sure I had all of the radiuses correct before marking up the stock. The drawer blades need to match the curves of the apron exactly since the lip of the drawers will be touching each of the curves.


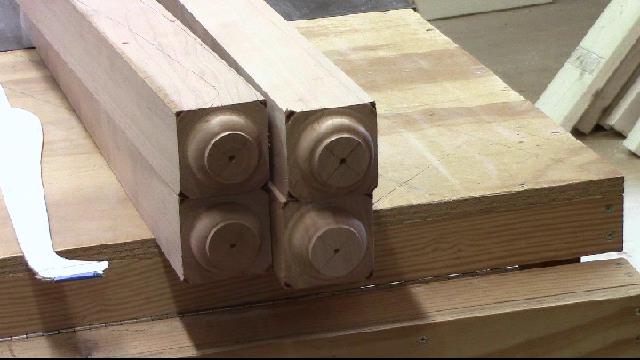
I milled some cherry 3/4 thick by 2 1/2 inches wide by 26 1/4 long plus the tenons.  Then I marked out the curves with the template.  I am going to cut this out fist and use them as a template for the apron.  I have tacked the two together so I can cut out both at the same time.


Here is the pair of them cut out. I used a spindle sander to clean up the saw marks and a chisel to make to blocking curves sharp.


The apron is curved in two directions.  The front and the bottom.  I traced the pattern on the top for the cut out of the front and I drew the curves on the bottom using a compass.
I will cut out the bottom first and then cut out the front. The stock is 2 1/2 inches thick by 4 inches high.


Before I bandsaw out the curves on the apron, I want to put the tenons on the ends while it is still square.  I use my table saw and tenoning jig.


Bandsawing the bottom of the apron.


Now that the bottom is complete, I need to band saw the front curves.


Bandsawing complete. Now I have to clean up all the saw marks.


I use my round bottom spokeshave to clean up most of the marks on the concave and convex curves.


I use a card scraper to clean up the marks that I can not get to with the spokeshave.


I fitted the apron into the mortises that I had cut earlier in the front posts.  This joint will be pegged when I glue up the piece.  It is looking good and I like the grain of the apron.


Next I use spacers to position the lower drawer blade or divider. I have already put dovetails on the end of the cross piece.  Then I use my marking knife to trace the dovetails on to the posts.  These dovetail sockets will go all the way through


In preparation for cutting out the through dovetail socket I use a marking knife and bench chisel to create a shoulder or groove for the saw to follow to keep it straight.  Then I cut it out with my dovetail saw.


I use a bench chisel to clean out the material between the saw grooves.


Lastly, I use a hand routing plane to flatten the bottom of the dovetail socket.in the post.


Next I cut a dovetail on the top drawer blade and use my marking knife to trace it on the top of the post.  The size of the dovetail was arbitrary but it looks good.


I cut out the dovetail socket like any other half blind dovetail


After sawing it out, I chopped out the waste.


There are the two drawer blades fitted to the posts. If you are careful when you mark out and saw the dovetails they should slide right in, sometimes it takes a little paring.

With those dovetails in the posts and the apron pegged, I don't think it is going to come apart anytime soon.


In the next post I will work on the vertical drawer dividers and drawer runners.

Here is today's video:
   

Wednesday, May 24, 2017

Curved Blockfront Lowboy Shaping Legs Sides & Back Step 2

In the last post I sawed the leg pattern out with the bandsaw.  The next step is to put the mortises in the legs.  I used the cardboard template to locate the mortise and mark them out on the legs.  I am going to make 3/8 inch mortises 1 inch deep.  I use my hollow chisel mortiser to complete this task although if you want you could drill out the mortises on a drill press and clean them up with a chisel


Once the mortises are in, I start to clean up the saw marks and shape the legs with a round bottom spokeshave.  I take light cuts and remove the saw marks and bumps.  I am trying to get a smooth continuous line.


I use a flat carving chisel to clean up the pad feet and a rasp to flatten the top of the foot.  This is kind of difficult since the top of the foot is all end grain.  It takes a bit of work then to get the deep scratches out left by the rasp.


Now the sides have to be rounded over with a file, rasp and spokeshave. The rear of the leg has to be filed since the spokeshave will not fit in the curve. You can see in the photographs that I have started to round over the edges of the leg and using the rasp and files to clean up the inside of the leg.


There they are all 4 cleaned up, shaped and sanded to 150 grit.  I will sand later to 180 before I glue them up.


Next is to start on the back.  This will be made from eastern white pine which was typical on this piece in the 18th century.

I have a large 16 inch pine board that I will cut to 28 1/4 inches.  The back needs to be 13 inches high.


The board is  too wide for my jointer so I will have to hand plane one side to get it flat, then I can get the other side flat by running it through the planner.


I use the table saw sled to square up the ends and cut it to length.


I use a dado stack in the table saw to put 1 inch tenons on the ends of the back and sides.


I use a small mortise block to check the thickness of the tenons.  They are a little thick at this point but I will use a hand plane to fit them to the mortises in the legs.


The sides are made the same way as the back.  Now I am ready to cut out the waste.


I lay out the tenons to match the mortises using the cardboard template like a story stick.


Saw out the waste using my dovetail saw and a coping saw.


I use a bench chisel to pare off the waste between the tenons.  It has to be flush or a little hollow.


Dry fitting the sides to the legs.  Nice tight fit.


With the three sides fitted, the next step is to concentrate on the apron.  It is a complex piece of curves.  That will be in the next posting.


Here is today's video:


Thursday, May 18, 2017

New Project - Building a Curved Blockfront Lowboy - Step 1

I am starting a new project, I made this piece 3 years ago in mahogany but this time I am going to make it in cherry.  I have a friend who would like to have it so I am building it for him.

First thing that I did was look for the plans and templates that I used the last time.  I was able to locate them.  I also watched my videos from the last time I built this piece to see if there are any improvements to the process that I used.


I started with one large 12/4 cherry board.  I should be able to get the 4 legs and the apron from this board.
I cut it to 32 inches which is 2 inches more than I need for the legs, but those 2 inches will  be used for the knee blocks.


The cabriolet legs are best when cut from radial grain patterns.  This 12/4 stock is mostly quarter sawn, or straight across grain.  I made this template window to see if I could adjust the grain on the leg billets to make them more interesting.  As you can see here I tilted the square across the grain and then cut out the blanks.  I then needed to square them up again.


Here they are squared up at 2 3/4 inches.  I have made a mark on the top of each pointing to the front of the cabriolet leg where the knee will be.  Then I trace the pattern on to two adjacent sides in the back.


Next I need to turn the pad feet on to each of the legs. The pad foot is 2 1/4 inches round and the pill which is the bottom is 1 1/2 inch rounds.  The larger pad is turned to the lower diameter.


All four ready to go.


Next I cut out the cabriolet legs on the band saw.  After cutting out the first side, I tape it back together and cut out the other side.  I have a number of videos in my channel which shows how to cut out cabriolet legs.
You need to be careful at the end to make sure you don't cut into the pad foot.


Here are the 4 legs cut out, now is can see how the grain looks on each leg and verify that the 2 front and 2 rear legs look good.


Next I cut the tops of the legs off to 1 3/4 inches using my band saw.  I could have put in the mortises at this point but it is not a problem if you save the cutoff to support the legs in the hollow chisel mortiser.


Lastly I mark out the mortises using my leg template like a story stick, the side and back mortises are the same.  I'll be using 7/8 inch stock for the sides and back and will be making a 3/8 wide by 1" deep mortise.


That's it for today, in the next post I'll be putting in the mortises and shaping the legs.

Here is today's video: