Search This Blog

Tuesday, May 2, 2017

Building a Second Workbench - Step 2

After gluing up the frame for the bench, I decided to work on the drawer runners next while I could still lift it and put it on the assembly bench.  I beats crawling around on the floor.

I started by making a story stick with the layout of all the drawers that I want to put into the workbench.  I decided on 3 on the right side and four on the left.  I transfer the marking from the story stick to the inside of the case.


I made some hard wood runners from poplar or maple that I had around the shop.  You can see that the runner that would be on the drawer fits between the two runners nailed to the inside of the bench.
They slide well with a little wax.


There are all the runners for the drawers.  I'll make the drawers later out of plywood.


Now to concentrate on the top.  It is made from 3/4 plywood, 3/4 mdf and 1 inch of maple tongue and groove for a total of 2 1/2 inches thick.  This is the same way I made my other bench.

Below is the two pieces of sheet goods to make the core of the top.  It is 30 inches wide by 76 inches long.


Now I need to attach the skirts or apron to the sides.  I have some 8/4 ash that I milled to 1 3/4 inches.
These need a 3/4 dado to create a mortise for the core of the bench to fit into.  This  helps keep the top flat.


Below I am putting the 1 1/2 inch dado into one of the pieces of the apron.  I am using a 3/4 dado set and make 2 passes.


The apron is fitted to 3 sides, the front will be a vise.  I have some 1 3/4 hard maple that I am going to use for the vise faces.


Gluing up the side and back aprons. The front is the vise face which is not glued at this time since it needs holes for the twin screw vise.


I started to work on the Lee Valley twin screw vice in the front. The two screws will be connected with a chain.  I am standing at the rear of the bench sizing up a single screw face vise that I will mount in the back.


I have to put a hold on installing the twin screw because the drive sprocket is defective.  Lee Valley is sending a new sprocket.


So while I was waiting for the new sprocket, I started to install the Lee Valley Large face vise.  I am pretty far along here having drilled the face and apron with the holes.  I used the holes in the vise face to position the holes in the apron.  I need to drill dog holes in the face of the vise before I put it together.  It is difficult to find a spot where they won't bump into some metal that is part of the vise.


Here is the face vise carriage mounted to the underside of the bench with 1/4 inch lag bolts.  You can see a spacer I used to lower the vise on the apron by 1/2 inch.  I have to avoid all that metal when I drill my dog holes.


The face vise is finished, now I can concentrate on the twin screw vise.


The new drive sprocket came today, so I put the vise together and bolted it to the face of the vise.
Cut the chain to length and attached it.


I adjusted the vise faces so they were flush.  That is easy since there are set screws on the right that you loosen and then turn the left until they are even.


Cut the aluminum cover and mounted it and it is complete.  Now I can work on the 1 inch maple tongue and groove wood for the top. That I'll have in the next post.


Here is today's video:

Saturday, April 22, 2017

Building a Second Workbench - Step 1

I built my main workbench about 15 years ago,  it is still in good shape and serves me well.  Recently I got rid of a large desk in my shop and decided to put a workbench where the desk was.

I thought about what the ideal workbench for me would be and decided that the current workbench was exactly what I need with just a few modifications.


The original design came from Ken Vaughn in Lakewood Colorado.  I saw a picture of his bench and liked it. I contacted him and he sent me a drawing of his bench.  So that is why I call it the Lakewood design.

The base is made of construction lumber, 2x4, 2x6 and 4x4.  The top is laminated with 3/4 plywood, 3/4 mdf and 1 inch tongue & groove maple for a total of 2 1/2 inches thick.
The sides are 5 1/2 wide and made from 1 3/4 oak.  The top is mortised into the sides. This helps keep it flat.


 The bench is 34 inches high which is the correct height for me. You can see I can put the palm of my hand on the top when standing next to it.  The top is 6 foot 8 inches long and 30 inches deep which again works well for the type of work that I do.
It has two vises, a Lee Valley twin screw on the right end and a large single screw vise on the left face.

As you can see there are 9 drawers below for tool storage.  There is also a shallow tool storage compartment in the back center with a lid.  I keep bench dogs and hold fasts in there.


I start with the feet marking a radius on the corners and under it to make feet. I used a bandsaw to cut them out.


You can see that I rounded the corners and made feet by cutting out underneath .


Next I need to mortise the feet for the legs.


Taking a little off of the tenon with my low angle block plane.  Should fit in the mortise now.


Looks like it fits now.


Both fit now and are square to the foot.


Now I need to add mortises for the cross braces. Once they were in I dry fitted the base and lined up the rear cross member.  All I need to do is add a mortise for this piece and it will be time to glue up the base.


Glued up the base on top of the current bench.  Now to start working on the top.


Here is today's video:

Thursday, April 13, 2017

Custom Kitchen Cabinet - Short Project

I finished the cabinets for my daughter and installed them in her living room.  They looked pretty good but she is yet to paint them.


Just when I finished that project, a friend called to ask if I would make a custom kitchen cabinet for a lady that he was working with.

I agreed to take a look and he talked me into making the kitchen cabinet. It should only take me about a day and one half.

I made a drawing and submitted it to the client and she approved.


I purchased some 1/2 inch and 1/4 in birch plywood, also some poplar.  The cabinet is to be painted.

I roughed out the frame with the 1/2 inch plywood. I am using a couple of sticks of scrap to hold it together at this point.  The angles make it hard to clamp up to see how it will look.


Next I need to make the face frame which is common for many kitchen cabinets.  Often cabinet makers use biscuits to join the face frame pieces.  But since this is a large front I used regular mortise and tenon joints of 3/4 inch deep.  Here I am gluing up the face frame and keeping it flat.  Note the 45 degree angle cuts on the edges to fit between the walls.


Next to make the doors.  I use my router bits to put a regular cope and stick joint on the edges of the cabinet doors.  I use the 1/4 inch birch plywood for the door panels.  This matches what she has in the kitchen.


Now to glue up the doors.


Now that the face frame is dry, I attach it to the front of the cabinet with glue and nails from the back side. Again, many cabinet makers would use biscuits to attach the face frame but with the 45 degree angles it is not that easy.  I added a piece of  4 inch poplar for a kick plate on the bottom. Here the cabinet is upside down so I could work on it easier.


After the doors had dried I attached them using Blum hidden hinges. I drilled 35mm holes in the backs of the doors to attached these hinges.


All done here with soft close hinges.


Hope it fits.  Here is today's video:


Tuesday, March 21, 2017

Back from Vacation and Making Cabinets for our Daughter

For those of you who thought I died, I didn't!  We took our annual trip to Florida for a warm up in February and then when I got back there was the honey-do list.
At least now I am doing some woodworking.
My wife promised our daughter that I would make custom cabinets for her living room and a surround for the fireplace.

This is what it looks like now.


This is what she wants it to look like.  I will just build it and install but I don't do painting.


First thing is to make a drawing of the space and what will be needed to build. I made a scale drawing of the space.  This allowed me to figure out how much lumber I needed as well.   Since she was going to paint it, the type of material was not as important so I chose poplar.


First I milled and glued up panels 12 inches wide by about 46 inches.  I have decided to use biscuits and glue to put it together.  Younger woodworkers would use a Festool Domino but I have an old biscuit joiner so that is what I am going to use.


I need to make 8 doors for the cabinets.  I use a matched set of cope and stick router bits to make the door frames.  This is typical for kitchen cabinet doors.  Below is one completed door.


One router bit puts the edge on the styles of door and the other bit puts the round over and groove for the panel.


Once the frame is made, then I make the panels to fit.  The cope and stick router bits leave a 3/8 inch groove all the way around for the panel to fit into.  The panel is made of 1/2 inch stock and a router bit puts the bevel on giving it a raised panel look.  The panel is slightly smaller that the total opening this allows for wood expansion of the solid wood panel.  The panel is not glued in. This is the way most kitchen cabinets are made. Not quite 18th century cabinet making.


Here is the first of the two assembled cabinets.  I have added an adjustable shelf to the middle of the upper space and a divider to the lower space.


I am holding a couple of the doors in place here.  Once  they are attached and sanded the cabinet will be done.


I have one more cabinet to make and then back to 18th century furniture.  This bureau desk is probably what I am going to make next.


Here is today's video: 

Friday, January 27, 2017

Chapin HighChest Sanding Finishing & Complete - Step 20

I mounted the cartouche on top and then began to mount the hardware.  I purchased the hardware early in the project from Optimum Brasses in the UK.  They had brass hardware which was very close to the original hardware on the highboy that is located at Winterthur.

I mount the hardware before final sanding of the piece because it allows me to fix things that might go wrong in the drilling and pounding process.


Next is sanding, sanding and sanding.  I am using a 5 inch orbital sander from years ago.  Works for me.  I had sanded to 120 before I put things together, now 150 and 180 grit.  Sander works well for large flat areas. But I have to hand sand all of the curved parts.


No machines here, I have to hand sand all of the little detail in the pediment and cartouche.  Very tedious process.


Now I have to make two mortises for locks.  The original chest only had 2 locks installed, so that is what I am doing.  I purchased the locks from Horton Brasses. I made a template and marked it out on the inside of the drawer.  Then I used my hand router to cut out the mortise and recess for the lock.


Here is where I spent most of my time for the last 2 weeks.  Finding the color that I wanted to put on the chest.  I must have tried a dozen different formulas until I settled on a non-grain raising dye from Behlen mixed with a similar dye from Lockwood.  Finally, got what I wanted and I am going to spray the alcohol base dye.


Using an Earlex HVLP gun to apply the dye stain, trying to get an even color on everything.  It dries almost immediately.  You would not want to wipe on stain or dye on cherry.  It can be done but you would have to put a blocker or pre-coat on first.

After it dried, I rubbed it out with white scotch pads to get the surface smooth, even though it is non-grain raising it still needs to be rubbed out.


After I rubbed it out, I was ready to spray shellac.  Usually, I finish with Waterlox but with winter my furnace is blowing hot air and dust around all the time which would be terrible with the slow drying Waterlox.  So I decided to spray blonde shellac, it dries almost immediately.

I still needed to sand off the dust numbs, overspray and orange peel.  I should spray more often, then I would improve my skills.

Here I am using 400 grit sand paper to scuff sand the shellac before the next coat.


I sprayed four coats of a 2lb cut of blonde shellac.  I let it dry for a couple of days before final rub out.

I rubbed out the chest with a gray scotch bright pad and dark wax.  I used dark wax because I did not want little white specks to show up.  Plain paste wax will leave white specks in cracks when it dries on a dark finish.


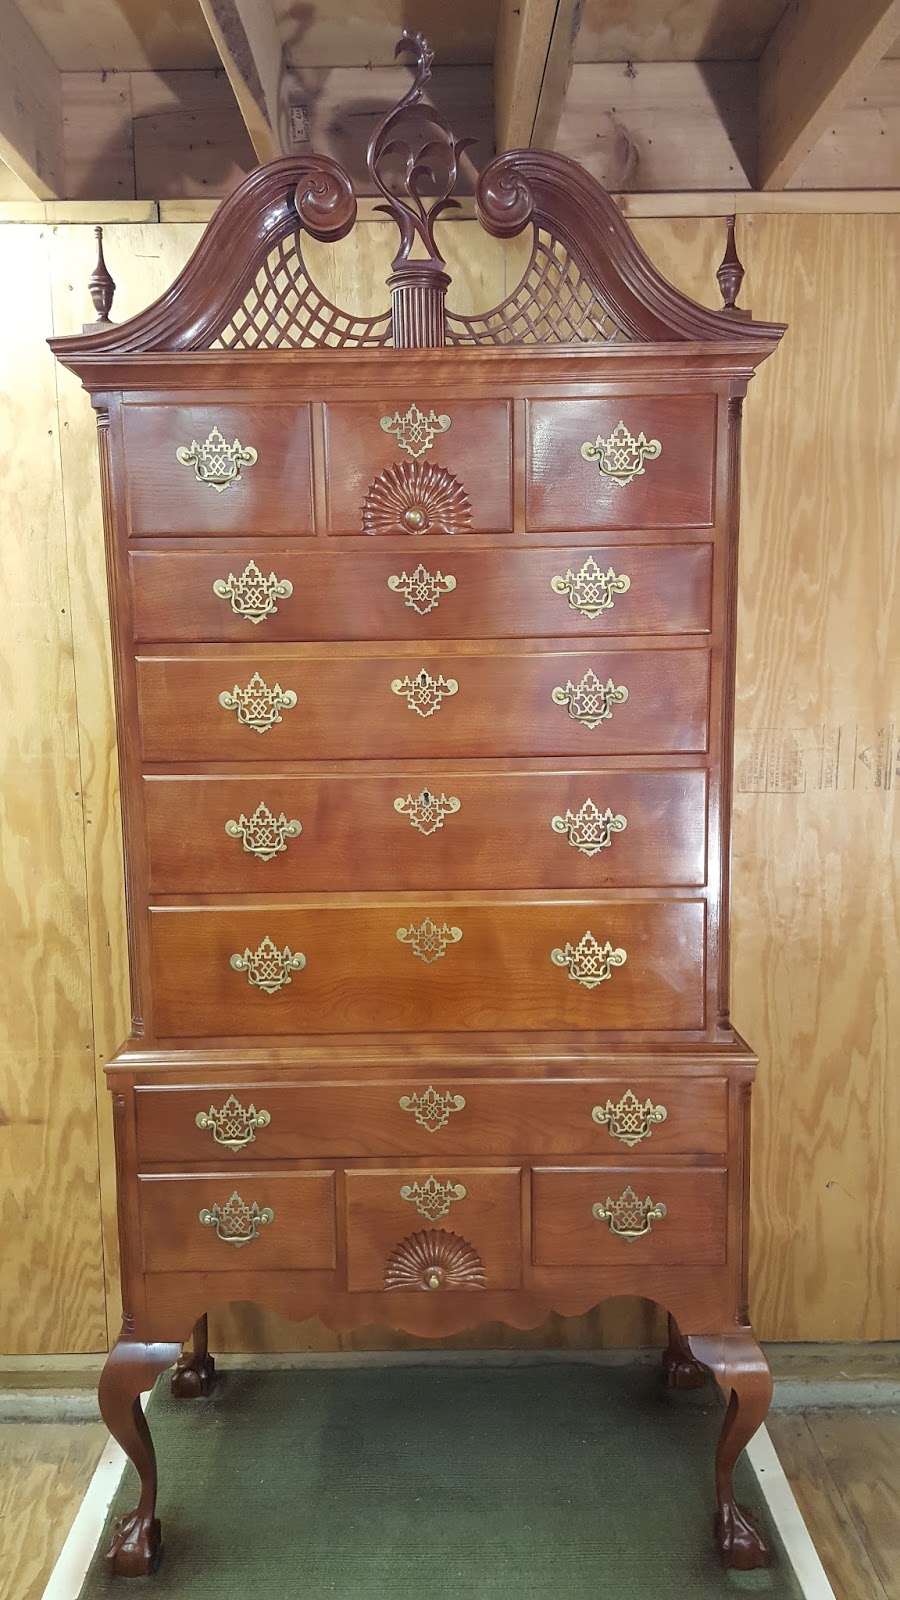
Here is the completed chest.  It was a bit of work but I learned a lot and stretched my ability.


Here is today's video: