Search This Blog

Friday, June 30, 2017

Curved Blockfront Lowboy Milling Top & Mounting Hardware Step 9

Time to start thinking about the top of the lowboy.  It is 21 3/4 inches deep by 33 1/2 wide.  I don't have cherry stock that wide so I'll have to glue up a few boards to get the width.
I have an 8/4 board that is 11 1/2 inches wide, if I resaw and glue it up it will be wide enough.


I need to use my large bandsaw for this task, it has 12 inch clearance under the blade guides. I milled 2 sides and 1 edge flat before resawing. This way I would have one side flat on each board after resaw.  I made sure that my fence was perpendicular to the saw table as well as the blade.  I have a 3/4 inch blade on the saw.


The resaw came out just fine with nearly 1 inch on both boards. I match the grain the way I want. I milled the boards to 7/8 and then joint the edges and glue up the panel.  After the glue up I flattened and sanded the panel to 13/16.


I use my crosscut sled on the table saw to square up the top. The top just fits in my crosscut sled which is 22 inches wide.


I use a left over drawer blade as a template for the curves on the front of the lowboy top.  I just traced a pencil line for the cut out.


I used a jig or sabre saw to cut out the pattern. The cut needs to be cleaned up with a spokeshave, files and sand paper before I put the edge on the top.

I get that in the next post and video.


Meanwhile, I decided to work on mounting the hardware on the drawer fronts.
I am using classic brass hardware from Ball & Ball Hardware.  The backplate is nice and flat but we need it curved to fit the drawer fronts.  In addition, it has to be curved in two different directions, concave and convex.


I have a wooden form with a smaller radius than the drawer fronts.  I can strap the brass to the form and when it is removed it springs back slightly.


I use strap clamps to bend and hold the backplate to the form.  I use a deadblow hammer to help the brass to fit the wooden form.


The bent backplate fits on the drawer front well. Now I have to bend the bail to fit the curve and drill the holes for the posts at a 15 degree angle.  I got the angle from my old video when I made this lowboy before.


I use the same technique for bending the bail, I use the strap clamp of hold it in place and then hit it with the deadblow hammer of bend it to the form.


I used my drill press with a jig set to 15 degrees, just a piece of scrap wood screwed to the face of a box on the drill press.


This allows me to rest the drawer on the jig at the correct angle for drilling.  I decided to drill a practice drawer front first.


Drilling the practice drawer front.


The holes worked out very well, the posts are at the correct angle and the bale fits right in the posts. So we are good to go with the drawers.


Bending a bail for the drawer front.


Looks good, the concave drawer fronts were completed by bending the backplate in the opposite direction on the same form.  I did change the angle of the drill jig to the opposite direction to drill the holes for the posts.


Got all of the hardware mounted and placed the top on.  It looks good.  I have to take the hardware off to do the sanding and finishing.


The next steps will be to put the edge on the top and carved the corners.  That will be in the next post and video.

Here is today's video:

Tuesday, June 27, 2017

Curved Blockfront Lowboy Kneeblocks & Finials Step 8

Today I started working on the knee blocks.   I had cut off 2 inches from the top of each leg stock before creating the cabriolet legs. I numbered them so I would know which belonged to each leg.

If  I am careful I will orient the grain to match the knees on the legs.


I made a cardboard template of what I think the knee block should look like and test fit the area.


I traced the shape on the block of wood and cut it out on the bandsaw.


At this point it needs to be shaped.


I put a screw in the back of the knee block so I can clamp it in the vise. 


I am using a Nickelson #50 rasp to take off the extra material and shape the knee block. I use files to smooth out the rasps marks later.


This is a pretty good shape and grain match.


I cut out and glued on all of the knee blocks. I only apply glue to the side of the knee block that touches the knee.  Not to the back of the knee block, that allows the wood behind it to move freely.
I left them a little proud so they can be pared off flush when the glue dries.


I use a sharp paring chisel to trim off the excess and a file to remove the excess on the bottom curve inside the knee.


The one on the right side of the knee is complete.  I like how the grain matches.


I started to work in the finials.  I did not shoot any new video of the turning of the finials but there is a video from the last time I made this piece here. Curved Blockfront Dressing Table Drop Finials Step 23  Here is a couple of shots from that video.


These finials came out a little better than the last time since I was able to turn the little ball on the end as one piece.  The last time I turned the little ball separate and glued it on. 


They also need what I call a washer which goes between the apron and the finial to create a transition from one to the other.
There it is all complete. I will glue in the finials just before I start the finishing of the piece.


Next post will be the top and the hardware.

Here is today's video: 

Tuesday, June 20, 2017

Curved Blockfront Lowboy Dovetails & Drawer Bottoms Step 7

In the previous post I laid out the tails, then sawed and chopped them out.  Then I used them to trace the markings on the sides of the drawer fronts.

For a detail discussion on half blind dovetails, here is a link to a prior video. Curved Blockfront Dressing Table Detail Half Blind Dovetails & Drawer Bottoms Step 20

I am chopping out the half blind dovetails for the drawer fronts.  These are 5/8 inch long.  I have sawed on the waste side of the line.  With my small dovetail chisel, I am able to feel the line that I scribed with the Lee Valley wheel marking gauge. I set the chisel in the groove and start to remove the waste material.


After removing the waste to the bottom of the socket, again I am able to put the chisel in the groove and slice out the last of the material for a nice clean edge on the bottom.


Below I am cleaning up the sockets to make sure they are at right angles to the dovetails.


Here is another time when I use my number marking on the insides of the drawer.  This is a number IV and it matches the one on the drawer front.  (I use Roman Numerals)


If I have been careful with my sawing and chopping, the dovetails should fit right in. Looks like a good fit.


After all the dovetails have been fitted, I need to put a 1/4 inch groove in the sides 1/4 inch from the bottom.  This is the groove for the drawer bottoms.  I have made a reproduction of a Sandusky  119 plough plane.  It designed to make grooves just like the one that we need here so I used it to groove the drawer sides.  It is much quieter than the electric router or table saw.


Now I use the band saw to cut out the back of the drawer fronts.  They are curved both front and back.


The curve in the back is the same radius as the front. Once it is removed the drawer fronts are 1 inch thick.


Now the tricky part, I could use a very small router plane to cut a 1/4 inch groove in the back of the drawer fronts. But I decided to use the electric router with a large baring to make the 1/4 inch groove. This groove is stopped so it does not go through the ends and should not be seen on the sides of the drawers.  I use a chisel to finish the groove.


I cut 7 3/4 inches for the drawer bottom from the 1/2 inch pine that I glued up in the prior post and video.


Now I need to put a bevel on the drawer bottom so that it fits in the 1/4 inch groove.  I use my router with a large bevel bit.  After a couple of passes I have the correct cut and thickness.
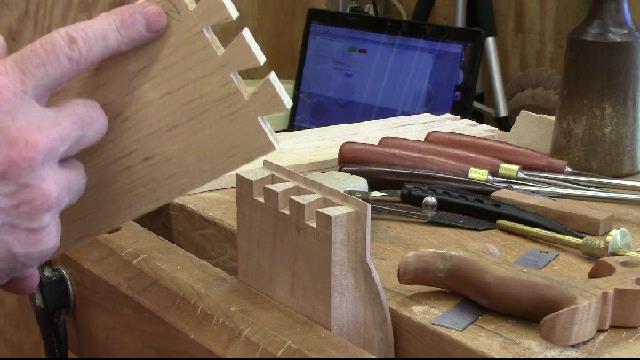
Early in the morning the sun comes in that window.  It makes quite a contrast


I slide the bottom into the drawer and trace the curve in the front on to the bottom and then cut out the curve on the band saw.  This way the bottom curve is sure to match the front groove.


After I cut out the curve, I run it back through the router bevel bit again to finish the curved bevel in the front.  It is an extra step to do it this way but it make a good fit in the curved front.


Now all I need to do is slip it in the groove.

I left out the step where I cut 1/2 inch off the back of the drawer to make an opening so the drawer front would slip in.


The drawer bottom is a little too long.  I will cut it off later but still leave about 3/16 inch sticking out the back.    It will be nailed in the back to hold it in.

That's how it was done in the 18th century. Without the power tools.


Next post I will work on the knee blocks and turned finials.

Here is today's video: