This is a half-size drawing of the chest, the top center and lower center drawer are the ones that have to be carved.

I wanted the grain to match as good as possible so I tried to get all of the drawers out of one board.
I selected the best board I had for the process. This board is over 10 feet long and 17 inches wide but I couldn't get all of the drawer fronts from this board. So I opted to get the top drawer fronts from this board.

And the lower drawer fronts from this board. The color and grain should match pretty well since all of the boards came from the same tree.

I milled the stock to 7/8 inches thick and put a 3/16 lip on top and sides of the fronts with a dado set on the table saw. Then with a router I put a 1/4 inch roundover on the drawer faces.
Below I have fitted the drawer faces to the lower chest.

Now for the upper chest. The grain looks good on all of them.

Now that I have all of the drawer fronts fitted to the openings, I need to mill a lot of pine for the sides and back. The sides will be 3/8 thick and the backs 1/2. These are the dimensions of the original chest.
I resawed 4/4 pine for the sides and 5/4 stock for the backs of the drawers.

Makes quite a pile of lumber for all 11 drawers and about a zillion dovetails to cut.

Below is a picture of one of the drawers on the original chest. I am going to follow this pattern for mine.

Laying out the tails on the sides of the drawers. I keep the top pin, bottom half tail and pin sizes the same on all the drawers but I very the size of the tails to evenly fit on each drawer size.

Saw on the line with my dovetail saw. There is a line made with a marking gage on the depth so I know where to stop which is 1/2 inch.

Then I chop out the waste with a bench chisel. These are half round chisels from Ashley Iles. My favorite for chopping small dovetails.


Now I match the tails to the sides of the drawer front and mark them out with a fine pencil.
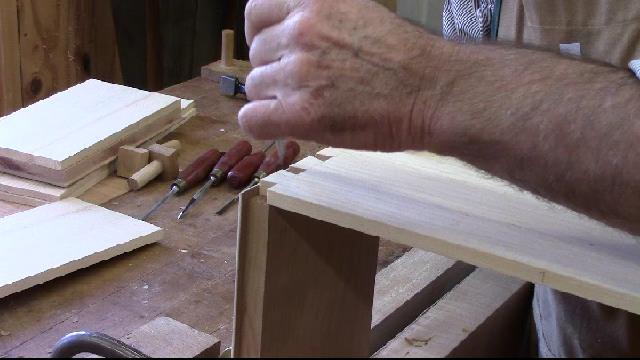
Sawing out the pins is a little more difficult, since there is a lip on the drawer and they are half blind you can not saw through the board. You have to tilt the saw at a steep angle and saw down into the drawer front. This is normal and can be seen on all hand made dovetails in the 18th century.
I always saw on the waste side of the line and leave the line on the board.


After chopping out the waste like the tails boards, I can fit the sides to the front. If I do it careful they should fit right in.

Good snug fit.

Now to assemble the drawer. Too tall to assemble on the bench, I am tapping them together with a deadblow hammer.

All of the drawer sides and backs are made. Now I have to mill a lot of pine to about 1/2 inch for the drawer bottoms. I need to put a groove on the inside of the drawers so I can slip in the bottoms in and glue them up. Final fitting will be done after they are glued up.

You may notice that I finally got around to gluing the lattice to the goose neck molding in this picture.
So now I am going to work on the bottoms and then the carving on to 2 drawer fronts.
Here is today's video:
No comments:
Post a Comment