It is constructed out of four pieces and the leg.
There is a rear backer board made from soft maple but it could be other wood as well. There are no tenons or fasteners on the backer board. It is held in place by gluing it to the front cherry swing arm pieces.
The cherry swing arm is made of three pieces. These are shown below. The first one is a short piece which is tenoned to the left leg and glued to the backer board and contains one half of the knuckle joint. The short piece on the right is tenoned into the right leg and glued to the backer board.
The middle swing arm has the other half of the knuckle joint and is tenoned into the swing leg.
Lots of work and fitting here.

There are the first two sections and will be the knuckle joint.

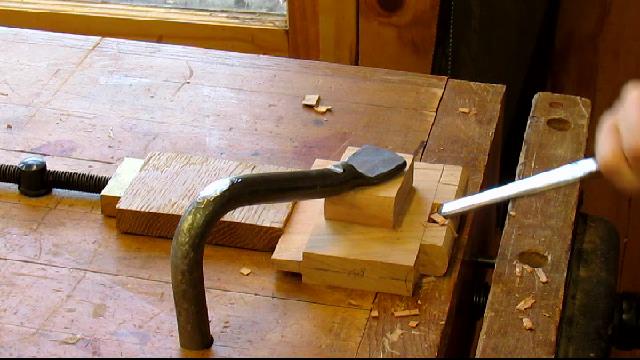
Rounding over the swing arm for the knuckle joint using a hollow plane that I made a few years ago.
This is a 5/8 inch radius. I have a small piece of cherry there as a backer so I don't tear out the edge as I plane the curve.


Laying out the hinge or knuckle joint now. Short end has two fingers, long end has the three fingers.

Saw on the waste side of the line, like cutting out dovetails.

Then chop them out, similar to chopping out dovetails.
I use a carving chisel to cut the curve for the hinge knuckles. I am using a #5 one inch wide which fits the curve. Doing the ends is easy, for the middle that will take a bit of work.

Using a depth gauge to check how deep I have to go. And then using a #3 and carving side to side to create the curve in the center opening. Takes a bit of work cutting across the grain.


Once the knuckles fit together, I drill a 1/4 inch hole offset from the center of the radius so that some of the knuckles stick out the back. These I will shave off so that the swing arm will only open to 45 degrees.
I drilled from both sides since the drill bit does not go all the way through. Don't use a long drill bit because they wander too much.

Below you can see how the sections line up.

I drove a 1/4 inch bolt as the hinge pin into the knuckle joint. I may use wood later but the metal is easier for now since I will remove it for assembling the table.

With the band saw, I cut out the back half of the swing leg so it will fit flush against the backer board.

I use a clamp to hold the backer piece in place and slip the tenon into the mortise on the leg.

I fitted the small piece of cherry to finish off the joinery for the rear swing leg. I leave about 1/16 inch between the swing and filler piece

I trace the pattern on the sides of the apron and then band saw out the curves.

Glue up of the base with Old Brown Hide Glue using strap clamps to hold it together until the glue dries.

Next chapter will be the shaping of the two rear corners and knee blocks
Here is today's video:
No comments:
Post a Comment