Search This Blog

Sunday, June 14, 2015

Cherry Oxbow Chest - Drawer Locks, Top and Back - Build Complete

I am getting to the completion of the cabinet, there are not too many steps remaining to complete the building process.

Now that the drawers are complete and planed to fit smoothly, I installed drawer stops.  I used small pieces of wood and glued them to the front on each side of the curve.   This stops the drawer just were I want them.   If I put the drawer stops in the back, then the drawer face can move in and out depending on the weather since they shrink in the winter.


 In the piece that I am copying, there are drawer locks in each drawer.  A lot of reproductions don't put in the locks but put on the escutcheon plates.  This time I want to be more correct and put the locks in all four drawers.

I purchased half mortise locks from Horton Brasses.  Traced the lock dimensions on to the back of the drawer and started to chop the mortise.  You can see that I am still using the cut offs to support the curved drawers so I can work on them.


My router plane comes in handy here to make a nice flat bottomed mortise.


I made the inside mortise first, then work on the outside mortise.  The line on the top of the drawer is the center line, you will want the key to be in the center of the drawer.  The mortise for the lock is offset because the pin for the key is not in the center of the lock.  


I drilled a small hole from the back where the key pin is, so that the center of the key hole will be marked on the drawer front.


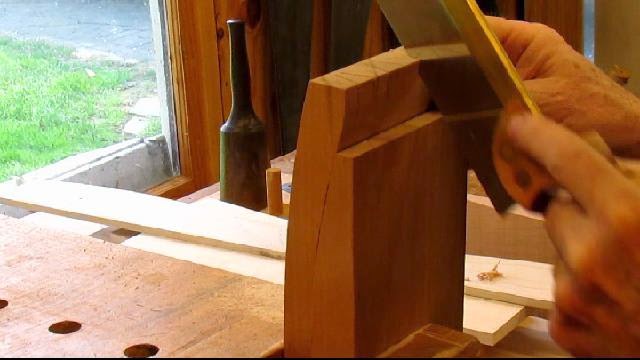
With the two mortises cut the lock fits in pretty well, but because of the curve I need to do a little extra paring to make it fit tight.  You can see how the lock is offset from center because of where the key hole is located.


Now I drilled a larger hole in the front from where the small pilot hole was drilled.  The lock pin is in the center of the hole.  I mark on the drawer front where the key shape is to be extended. 


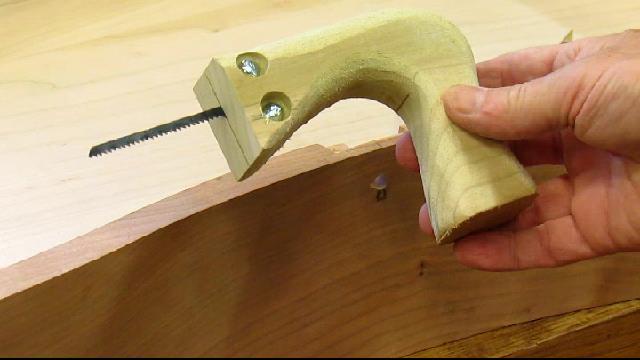
I don't have a key hole saw, so I made a simple handle and used a jig saw blade to work in the small opening.  It cuts on the pull stroke.


After completing the first lock mortise and key hole, I made cardboard templates to be used on the next three.  It made it much easier to setup and cut.  There was one for the inner mortise and one for the outer mortise.


Now with the lock mortises out of the way, I turned my attention to the top.  I had resawed an 8/4 piece of cherry that was 12 inches wide and glued it up.  This made the 21 3/4 that I needed for the top.  Made a nice book-matched grain pattern.


I cut out the front of the top to match the curves of the drawer fronts using the pattern that I had for the drawers.  Then I added an ogee shape to the underside of the the top.  This is the first time I have put a molded edge on the underside of a top.  The piece that I am copying is pictured on the wall behind and I am following it.

I made some half lap pine boards for the back.  These fit into the 1/2 inch groove that I made around the inside of the case.  I used small nails to hold them in place.


I left small gaps between each of the pieces to allow of the expansion of the boards.


All done with the build.  Now I need to attach the hardware, then remove it to begin the finishing.

Here is today's video:

Saturday, June 6, 2015

Cherry Oxbow Chest - Making the Drawer Bottoms - Step 12

At this point I could go to the big box store and buy some 1/4 inch plywood and cut it to fit in the drawer bottoms, but that would not be period like....  When I first started making furniture that is what I did based on the fact that if period furniture makers had plywood they would have used it.

Today, I make solid wood bottoms, it takes a little longer but a solid panel bottom is what people expect.  The bottoms are often made of pine but I don't have enough to make all of them and obtaining clear pine is not easy or cheap.   Soft maple is inexpensive and I always have plenty on hand.

The drawer bottoms are 32 1/2 x 18 1/2 inches with the grain running parallel to the front.  This allows for the expansion of the bottom out the back of the drawer.  I decided to make the drawer bottoms 7/16 inch thick so I can resaw the maple and not get a lot of waste.


Each of the boards is about 8 inches wide, so it will take 3 boards to glue up to get the required width.


I try to keep them as flat as possible when I glue them up by using culls.

After the glue dries I'll use my wide belt sander to flatten and clean them up.

I traced the curve from the inside of the drawer front on to the drawer bottom and then cut out  the pattern on the band saw.  I cleaned up the edge after sawing with the spindle sander.


Next I have to add a bevel to the bottom of the panel so that it will fit into the 1/4 inch grove in the sides and the front.  The straight edges could be done with a panel raising plane but the curved edges need to be done another way.   I have a large router bit that is a horizontal panel raiser.  I use it at a low speed and make several light passes to get it to the thickness that I want.  It does a nice job on the curved front.  


Below is the finished bevel.  I test fit it into the grove to make sure it is thin enough.  


For the straight groves on the drawer sides, I use my plow plane.  I could have used a dado blade or router bit to cut the grooves but I like to use hand planes too and they are quieter.  There are 8 sides to do.


For the curved drawer fronts, I go back to the router with a 1/4  inch slot clutter.  It makes quick work of the curved slot.


I cut off a 1/2 inch on the drawer backs to make an opening to slide in the drawer bottom.  If everything is correct it slips right in.


Look's like a good snug fit.  The back is slightly proud but that is the way it was done in the 18th century.


The bottom bevel fits well into the groove.  I will nail the bottom to the back with a couple of small brads after the drawer is glued together.


Now I have to glue up the drawers and make the chest top.  I ordered the hardware yesterday so it should be here very soon.  Once the top is made, I need to make a back and the chest construction will be complete.   Then on to finishing.

Here is today's video:

Monday, May 25, 2015

Cherry Oxbow Chest - Hand Cut Drawer Dovetails - Step 11

I went to the Handworks 2015 in Amana,  Iowa May 15-16 and met a lot of great hand tool vendors and woodworkers.  A number of fellow SAPFM members were there and of course Doug Moulder and his wife.


I was interested in the Benchcrafted Moxon Vise hardware  and I got to  try it out. So I bought the hardware and will be making one in the near future.  It is nice to have a vise with 22 to 24 inches between the centers.


After the trip to Iowa, I went on a family vacation to Hilton Head Island in South Carolina for a week so my shop time has been limited

I did get to milling the wood for the drawer sides and backs.  I did not have enough pine, so I decided to use soft maple.  The sides and backs will be 1/2 inch thick.


I still had not cut out the backs of the drawer fronts.  This I had to do now before I could cut the half-blind dovetails.  I have decided to make a 3/4 inch long dovetail on the front.  With the oxbow curve on the fronts makes it difficult to dovetail.  So I layout a 3/4 inch square shoulder on the side of the drawer front to accommodate the dovetails.
 
You can see the original line and the modified line for the curve on the back of the drawer front in the above picture.  This will provide a nice square shoulder for the drawer side.

Then I used my bandsaw to cut out the curve on the back of the drawer front.  I keep the cut offs to use when clamping the drawer fronts.  To clean up the backs saw marks I used a spindle sander and spokeshave to remove them but not as clean and smooth like the fronts.

I choose to make a simple pattern for the dovetails.  The bottom has a half tail to allow for the groove for the drawer bottom.  The pins are evenly spaced with a half pin at the top so the cherry shows when you open the drawer.  I mark out all of the waste so I don't forget which ones to remove.


After sawing on the lines to the scribe mark, I chop out the dovetails with a bench chisel.  I leave the front of the waste to support the piece when I turn it over and chop the other side.  This is not the fastest way to cut dovetails but I find it relaxing and do it at my own pace.  If you look at the video you can watch me chop them out at twice the speed.


All done with this one.


I keep the cut offs from the curved drawer front so I can put them back when I need to square up a board or clamp them in a vise or hold fast.  Here I am squaring up the side to the front to trace the pins on the side of the drawer front.


Sawing out the pins after I traced them from the tails on the drawer sides.  You have to remember to saw on the waste side of the line. I try to saw the line in half when I cut them.  You have to angle the saw so that it does cut into the back of the drawer front but this is normal with half blind hand cut dovetails.


Chopping out the pins on the drawer front after sawing.  I work from the front removing the waste a little at a time, since the saw does not get into the corners as you get lower into the cut you have to chop out the edges. I use the scribe line to set my chisel for the last cut on the half blind.

Again, you can see I use the cut offs to support the work in the middle where the hold fast is clamped and under the edge where I am chopping.


If you are careful when you saw and chop out the dovetails, they should fit tight together without a lot of paring. Practice, practice, practice.  Here you see me using the cut off again to clamp the drawer front in the vise.


All done with the four sides and the drawer frame is square. The dovetails are tight enough that the drawer holds it's shape while I fit it into the opening.


In the next post, I need to glue up some stock for the drawer bottoms, cut a 1/4 inch groove around the inside and bevel the drawer bottom to fit  the groove.

Here is the video from today's post:

Friday, May 8, 2015

Curved Oxbow Drawer Fronts - Take a bit of hand planing Step 10

Now that the feet are completed, I am turning my attention to the drawers.  First, of course are the drawer fronts.

I have my template from making the drawer blades, so I am using that to trace out and size the drawer fronts.

I selected the stock from a large 8/4 cherry board that I used a portion for the bracket feet.  I purchased this board with the intent it would be used for the drawer fronts.   This picture is the smaller portion of the board which was used for the bracket feet.  The board was originally 12 feet long and 15 inches wide.  It had great looking grain as well.


I selected the grain pattern that I wanted and chopped and ripped the board into four pieces approximately the size of the drawer fronts.  You can see my template in the lower portion of the picture.


The boards are still slightly wider and longer than I need but I cut them to size soon.
I traced the pattern on to the top of the drawer fronts.


Now I chopped and ripped the drawer fronts to the exact size, prior to bandsawing out the front curve.

Here are the drawer fronts fit into the chest openings prior to bandsawing.  It is good to know that they fit while they are square before cutting out the shape.


Bandsawing out the front only.  It is good to have a flat square reference surface while planning and finishing the fronts.  I used a 3/8 inch band saw blade here but I did not get good results with the cuts. It left a lot of work to clean up, maybe it was not sharp or I didn't have the saw set up well.


You can see that these are not the cleanest bandsaw cuts that I have ever made.  At least I left extra material that needs to be removed to make the actual curves.  However I did not expect it to be that bumpy.


I haven't used my compass plane since I made my bombe chest, but I think this is the perfect application for this plane.  I start by smoothing out the two convex curves on both ends of the drawer front.  I have the compass plane set to take small shavings.  I make frequent trips to fit the drawer front into the opening and check the progress.  I want it to match the opening exactly.


Working this direction is great, but going in the opposite direction I hit the bottom of the curve too quick and can not complete the curve.  I have to use my curved bottom spokeshave.


Nice thing about the compass plane is that it can plane both curves just by adjusting the plate by turning the center screw.  It takes some practice to get the plane sole just right to match the curve so you can take good shavings.   Here I am clearing out the bottom of the curve.

The wooden coffin smoother plane you see in the background is used for quick roughing the convex shapes before using the compass plane.  It is a nice small plane and easy to use.


Not a great picture of me using the plane on the concave curve.  Watch the video, it does nice work.  I am still making frequent trips back to the chest to check the progress of the curve against the drawer blades.  I want it to fit exactly.


One drawer front fit.  Looking good.  I may have to do some fine tuning later.  On to the next drawer.


The second drawer front was easier than the first because it is getting smaller.  Also I want to mention that I am using a card scrapper to clean up the plane marks after I achieve the matching curve that I want.  That will save me a lot of sanding later.


Last drawer front.  Like most tasks, I am just getting the hang of it as I am finishing.  But I am glad to be done with the planning and scrapping.


All of the drawer fronts are done now.  It's good to have this completed, now all I have to do is cut out the backsides  (which don't have to be as pretty as the fronts) and  dovetail the drawer sides and back.


I like the grain pattern on the drawer fronts.  On to making the drawers, sides and backs.

Here is today's video: