
I was interested in the Benchcrafted Moxon Vise hardware and I got to try it out. So I bought the hardware and will be making one in the near future. It is nice to have a vise with 22 to 24 inches between the centers.

After the trip to Iowa, I went on a family vacation to Hilton Head Island in South Carolina for a week so my shop time has been limited
I did get to milling the wood for the drawer sides and backs. I did not have enough pine, so I decided to use soft maple. The sides and backs will be 1/2 inch thick.

I still had not cut out the backs of the drawer fronts. This I had to do now before I could cut the half-blind dovetails. I have decided to make a 3/4 inch long dovetail on the front. With the oxbow curve on the fronts makes it difficult to dovetail. So I layout a 3/4 inch square shoulder on the side of the drawer front to accommodate the dovetails.

You can see the original line and the modified line for the curve on the back of the drawer front in the above picture. This will provide a nice square shoulder for the drawer side.
Then I used my bandsaw to cut out the curve on the back of the drawer front. I keep the cut offs to use when clamping the drawer fronts. To clean up the backs saw marks I used a spindle sander and spokeshave to remove them but not as clean and smooth like the fronts.
I choose to make a simple pattern for the dovetails. The bottom has a half tail to allow for the groove for the drawer bottom. The pins are evenly spaced with a half pin at the top so the cherry shows when you open the drawer. I mark out all of the waste so I don't forget which ones to remove.

After sawing on the lines to the scribe mark, I chop out the dovetails with a bench chisel. I leave the front of the waste to support the piece when I turn it over and chop the other side. This is not the fastest way to cut dovetails but I find it relaxing and do it at my own pace. If you look at the video you can watch me chop them out at twice the speed.

All done with this one.

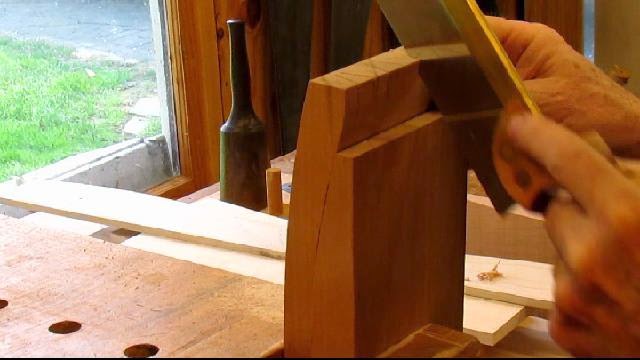
I keep the cut offs from the curved drawer front so I can put them back when I need to square up a board or clamp them in a vise or hold fast. Here I am squaring up the side to the front to trace the pins on the side of the drawer front.

Sawing out the pins after I traced them from the tails on the drawer sides. You have to remember to saw on the waste side of the line. I try to saw the line in half when I cut them. You have to angle the saw so that it does cut into the back of the drawer front but this is normal with half blind hand cut dovetails.
Chopping out the pins on the drawer front after sawing. I work from the front removing the waste a little at a time, since the saw does not get into the corners as you get lower into the cut you have to chop out the edges. I use the scribe line to set my chisel for the last cut on the half blind.
Again, you can see I use the cut offs to support the work in the middle where the hold fast is clamped and under the edge where I am chopping.

If you are careful when you saw and chop out the dovetails, they should fit tight together without a lot of paring. Practice, practice, practice. Here you see me using the cut off again to clamp the drawer front in the vise.

All done with the four sides and the drawer frame is square. The dovetails are tight enough that the drawer holds it's shape while I fit it into the opening.

In the next post, I need to glue up some stock for the drawer bottoms, cut a 1/4 inch groove around the inside and bevel the drawer bottom to fit the groove.
Here is the video from today's post:
No comments:
Post a Comment