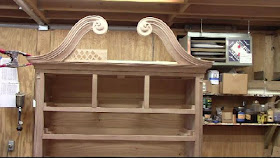
The gooseneck moldings came out well using the method I described in the previous two blog posts. Lots of carving.
I have a full sized picture of the molding and fretwork from the original Chapin chest, so I was able to copy the pattern.
I milled a piece of cherry 10 1/4 by 32 3/4 inches to cover the entire area of the lattice fretwork.
Then resawed it to 3/8 of an inch thick. I mounted it in the rebate that is behind the gooseneck moldings so I could trace the pattern on the stock.
Now I could trace the lattice fretwork pattern on to the board from the photograph.
Using the bandsaw I cut out the pattern around the outside of the gooseneck molding and leaving room for the pedestal in the center of the fretwork.
Then I drilled holes in each of the squares so I could put a scroll saw blade through and cut out the waste from each square.
I used my scroll saw to start to cut out the squares but it proved to be too slow. Each time I switched squares I had to raise the blade, move to a new square and then refasten the blade under the table.
So I tried a jig saw or saber saw, I used it free hand and that worked ok but it was cutting on the up stroke and leaving rough edges on the squares.
I used this box with the jig saw mounted under the surface before for another project, only the blade fit through the top. I thought I would give it a try.
This allowed me to easily place the squares on the sawblade and maneuver the piece to cut out the waste in the squares. It also cut on the downstroke so the tearout was on the bottom or back of the lattice.
Need to carve the intersection of each square so that it looks like a basket weave, this is not difficult just tedious.
Clamped in place for the time being, I need to make the pedestal and cap in the center and then decide whether to glue it or screw it together.


No comments:
Post a Comment