Search This Blog

Wednesday, May 24, 2017

Curved Blockfront Lowboy Shaping Legs Sides & Back Step 2

In the last post I sawed the leg pattern out with the bandsaw.  The next step is to put the mortises in the legs.  I used the cardboard template to locate the mortise and mark them out on the legs.  I am going to make 3/8 inch mortises 1 inch deep.  I use my hollow chisel mortiser to complete this task although if you want you could drill out the mortises on a drill press and clean them up with a chisel


Once the mortises are in, I start to clean up the saw marks and shape the legs with a round bottom spokeshave.  I take light cuts and remove the saw marks and bumps.  I am trying to get a smooth continuous line.


I use a flat carving chisel to clean up the pad feet and a rasp to flatten the top of the foot.  This is kind of difficult since the top of the foot is all end grain.  It takes a bit of work then to get the deep scratches out left by the rasp.


Now the sides have to be rounded over with a file, rasp and spokeshave. The rear of the leg has to be filed since the spokeshave will not fit in the curve. You can see in the photographs that I have started to round over the edges of the leg and using the rasp and files to clean up the inside of the leg.


There they are all 4 cleaned up, shaped and sanded to 150 grit.  I will sand later to 180 before I glue them up.


Next is to start on the back.  This will be made from eastern white pine which was typical on this piece in the 18th century.

I have a large 16 inch pine board that I will cut to 28 1/4 inches.  The back needs to be 13 inches high.


The board is  too wide for my jointer so I will have to hand plane one side to get it flat, then I can get the other side flat by running it through the planner.


I use the table saw sled to square up the ends and cut it to length.


I use a dado stack in the table saw to put 1 inch tenons on the ends of the back and sides.


I use a small mortise block to check the thickness of the tenons.  They are a little thick at this point but I will use a hand plane to fit them to the mortises in the legs.


The sides are made the same way as the back.  Now I am ready to cut out the waste.


I lay out the tenons to match the mortises using the cardboard template like a story stick.


Saw out the waste using my dovetail saw and a coping saw.


I use a bench chisel to pare off the waste between the tenons.  It has to be flush or a little hollow.


Dry fitting the sides to the legs.  Nice tight fit.


With the three sides fitted, the next step is to concentrate on the apron.  It is a complex piece of curves.  That will be in the next posting.


Here is today's video:


Thursday, May 18, 2017

New Project - Building a Curved Blockfront Lowboy - Step 1

I am starting a new project, I made this piece 3 years ago in mahogany but this time I am going to make it in cherry.  I have a friend who would like to have it so I am building it for him.

First thing that I did was look for the plans and templates that I used the last time.  I was able to locate them.  I also watched my videos from the last time I built this piece to see if there are any improvements to the process that I used.


I started with one large 12/4 cherry board.  I should be able to get the 4 legs and the apron from this board.
I cut it to 32 inches which is 2 inches more than I need for the legs, but those 2 inches will  be used for the knee blocks.


The cabriolet legs are best when cut from radial grain patterns.  This 12/4 stock is mostly quarter sawn, or straight across grain.  I made this template window to see if I could adjust the grain on the leg billets to make them more interesting.  As you can see here I tilted the square across the grain and then cut out the blanks.  I then needed to square them up again.


Here they are squared up at 2 3/4 inches.  I have made a mark on the top of each pointing to the front of the cabriolet leg where the knee will be.  Then I trace the pattern on to two adjacent sides in the back.


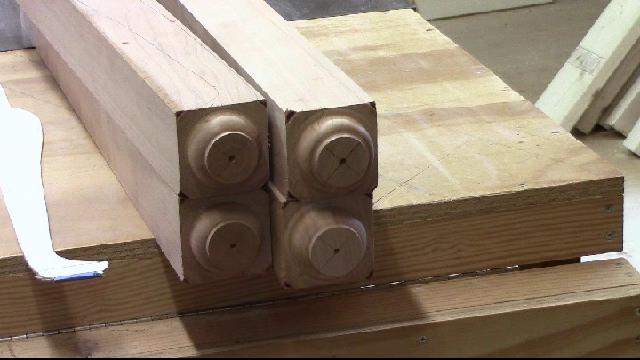
Next I need to turn the pad feet on to each of the legs. The pad foot is 2 1/4 inches round and the pill which is the bottom is 1 1/2 inch rounds.  The larger pad is turned to the lower diameter.


All four ready to go.


Next I cut out the cabriolet legs on the band saw.  After cutting out the first side, I tape it back together and cut out the other side.  I have a number of videos in my channel which shows how to cut out cabriolet legs.
You need to be careful at the end to make sure you don't cut into the pad foot.


Here are the 4 legs cut out, now is can see how the grain looks on each leg and verify that the 2 front and 2 rear legs look good.


Next I cut the tops of the legs off to 1 3/4 inches using my band saw.  I could have put in the mortises at this point but it is not a problem if you save the cutoff to support the legs in the hollow chisel mortiser.


Lastly I mark out the mortises using my leg template like a story stick, the side and back mortises are the same.  I'll be using 7/8 inch stock for the sides and back and will be making a 3/8 wide by 1" deep mortise.


That's it for today, in the next post I'll be putting in the mortises and shaping the legs.

Here is today's video:

Monday, May 8, 2017

Building a Second Workbench - Step 3

Moving right along with the construction of the new bench, I am now concentrating on completing the top.  I need to mill 1" maple tongue and groove stock.  I use the table saw with a dado set to create a 1/4 groove to match the 1/4 inch tongue that I created.


Dado the groove on the table saw.


Dry fitting the maple to the core of the bench top.  I am making a brick pattern.  The maple has a 2 1/2 in face with a 1/4 inch tongue.


All fitted, except for the last row.  The last row will be a little smaller than the others.   I will rip it to size after all of the others are installed.  Now I number each piece so that I can install them exactly as they were dry fitted.


I use glue and nails to hold down each piece.  I am about half done with installing the maple top here.


Installed all of the maple top at this point.  I know about wood expansion and contraction.  So in the winter the cracks between the boards will be a little wider and in the summer they will be a little smaller.  The old bench was made the same way and the wood never moved so much as to cause it to buckle.


I flatten the top of the work bench with my #7 jointer plane.  It takes a little time and gives me a good work out.


Next I started making the drawers out of 3/4 inch plywood.  These are mortised using the dado set to create a 3/8 inch groove and a 3/8 inch tongue in the ends.  These slip together to create a good sturdy drawer once it is glued and nailed together.


After gluing and nailing the sides together I put the bottom plywood panel into a 1/4 inch groove along the bottom of the drawer.  Then I added a 3/4 front panel to create the drawer front.


I tacked the drawer runner on to the sides and they fit into the drawer openings.


Now I need to drill the 3/4 inch dog holes in the bench top.  They are aligned to the holes in the vise face and 6 inches apart.
I made a jig to help keep the drill bit to be 90 degrees perpendicular to the bench top.  It did help but it was not perfect.


Now that the holes are drilled it is time to finish the bench.  I am using a tung oil product named Watco Danish Oil.  I applied two coats.


The bench is complete and ready for use.  Should last a life time.


Here is today's video:

Tuesday, May 2, 2017

Building a Second Workbench - Step 2

After gluing up the frame for the bench, I decided to work on the drawer runners next while I could still lift it and put it on the assembly bench.  I beats crawling around on the floor.

I started by making a story stick with the layout of all the drawers that I want to put into the workbench.  I decided on 3 on the right side and four on the left.  I transfer the marking from the story stick to the inside of the case.


I made some hard wood runners from poplar or maple that I had around the shop.  You can see that the runner that would be on the drawer fits between the two runners nailed to the inside of the bench.
They slide well with a little wax.


There are all the runners for the drawers.  I'll make the drawers later out of plywood.


Now to concentrate on the top.  It is made from 3/4 plywood, 3/4 mdf and 1 inch of maple tongue and groove for a total of 2 1/2 inches thick.  This is the same way I made my other bench.

Below is the two pieces of sheet goods to make the core of the top.  It is 30 inches wide by 76 inches long.


Now I need to attach the skirts or apron to the sides.  I have some 8/4 ash that I milled to 1 3/4 inches.
These need a 3/4 dado to create a mortise for the core of the bench to fit into.  This  helps keep the top flat.


Below I am putting the 1 1/2 inch dado into one of the pieces of the apron.  I am using a 3/4 dado set and make 2 passes.


The apron is fitted to 3 sides, the front will be a vise.  I have some 1 3/4 hard maple that I am going to use for the vise faces.


Gluing up the side and back aprons. The front is the vise face which is not glued at this time since it needs holes for the twin screw vise.


I started to work on the Lee Valley twin screw vice in the front. The two screws will be connected with a chain.  I am standing at the rear of the bench sizing up a single screw face vise that I will mount in the back.


I have to put a hold on installing the twin screw because the drive sprocket is defective.  Lee Valley is sending a new sprocket.


So while I was waiting for the new sprocket, I started to install the Lee Valley Large face vise.  I am pretty far along here having drilled the face and apron with the holes.  I used the holes in the vise face to position the holes in the apron.  I need to drill dog holes in the face of the vise before I put it together.  It is difficult to find a spot where they won't bump into some metal that is part of the vise.


Here is the face vise carriage mounted to the underside of the bench with 1/4 inch lag bolts.  You can see a spacer I used to lower the vise on the apron by 1/2 inch.  I have to avoid all that metal when I drill my dog holes.


The face vise is finished, now I can concentrate on the twin screw vise.


The new drive sprocket came today, so I put the vise together and bolted it to the face of the vise.
Cut the chain to length and attached it.


I adjusted the vise faces so they were flush.  That is easy since there are set screws on the right that you loosen and then turn the left until they are even.


Cut the aluminum cover and mounted it and it is complete.  Now I can work on the 1 inch maple tongue and groove wood for the top. That I'll have in the next post.


Here is today's video: