Search This Blog

Friday, July 15, 2016

Chapin High Chest of Drawers - Test Quarter Columns & Cabriolet Legs

Having completed my drawings and planning for the high chest, I decided to start with the cabriolet legs.

I need four 32 inches long with the leg portion 15 inches and the post portion 17 inches.  The post contains a quarter column with four flutes.

I did measure the opening and column when I was at Yale, but when I made a sample quarter column it looked too small to me and I started to doubt my measurements.  So I decided to make a mock up.

 I cut a piece of maple to 1 3/4 square and then put a 1 x 1 opening in it.  This would be like the column over the cabriolet leg.


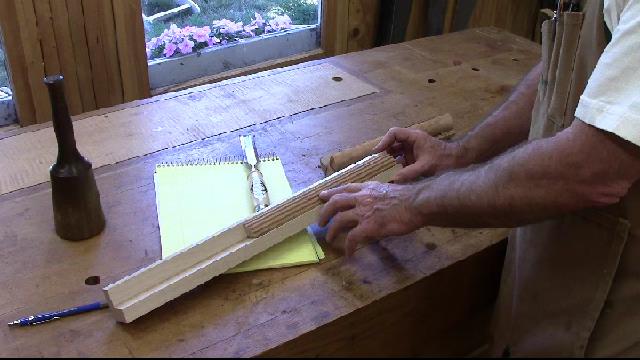
Then I glued up four 7/8 inch piece of scrap cherry with craft paper and hyde glue. After it dried I turned it round on the lathe.
I split it apart with a chisel, usually this is easy but it was real sticky.


Had to scrape the sticky paper off of the quarter column.


I fit the quarter column into the opening in the wood.  It looked ok but I still wanted to see how it would look when I added the flutes.


So I glued it back together and put the cylinder back in the lathe and put four flutes in one quarter column.  I will show this in detail later when I actually make them or you can look at an old project when I made them before cherry-oxbow-chest-making-quarter.html


Here it is with the flutes and they look ok. So I have verified the dimensions for the columns. I guess I am ready to prepare the stock for the legs.

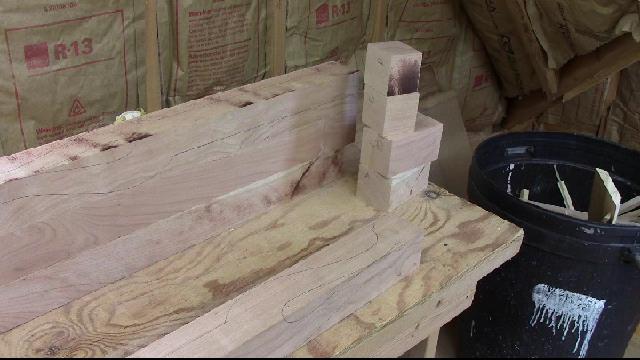
I have a 10 foot long 12/4 cherry board which is 7 inches wide.  I will get two legs from each cut off.  I add 3 inches to the 32 to allow extra stock for the knee blocks.


The down side to this nice cherry board is that it has quarter sawn grain.  This is not ideal for making cabriolet.  Normally, you want flat sawn boards where the grain runs out on a corner.
But this is all that I have so I will have to look at the grain after they are cut out.

Using a hand saw to cut up the 35 inch billets.

Squaring up the stock on the jointer to get two good edges.

Plane and rip the boards into 3 inch square legs.  Trace the template on the leg watching where the grain will be and then chop of the extra for the knee blocks.
Blew a tire off the bandsaw just as I started to saw them out.  Off to Woodcraft to pick up a new tire.

Bandsawing out the leg pattern. I do one side and then tape it back together and then do the other side.

Now I am able to see just how the grain looks on all four sides.  I actually did six legs then picked the best four.

I now know how the legs will be positioned on the chest I can put in the mortises while the top column is still square.  Mortising will be in the next video.

Here is today's video:

Wednesday, June 29, 2016

Starting a New Project - E. Chapin High Chest of Drawers - Trip to Yale Furniture Study & Planning Step 1

I have selected my next project.  After completing a couple of smaller projects, I have decided to take on a very large project.

I really like working with cherry and many of the Connecticut Valley pieces are made with cherry as the primary wood.

In particular, Eliphalet Chapin's work is so outstanding that it started an entire movement and of course copied by other craftsman at that time.  I have built two Chapin pieces so far, an arm chair and chest of drawers.  This piece with certainly challenge my skills.

I first found the chest in New England Furniture In Winterthur by Nancy Richards and Nancy Evans
Below is a picture from the book.


Winterthur has many of their objects digital on-line.  Here is a photograph I pulled off of their site. It is an excellent straight on picture.


I converted the picture to a PDF and scaled it to full size on my engineering plotter.  Here are two parts of the chest on my shop wall.  From the full size prints I could measure and determine the dimensions.  I also made some templates.


I also made a line drawing in half size and a side view in quarter size.


But I did not have any thicknesses. I could guess at many but I really would like to study the piece in person. There are four of these chests that are known to exist in museums.   Fortunately for me the Yale Furniture Study has one of these pieces.  I contacted Yale and made an appointment to study the highchest.
So here I am at the Yale Furniture Study in New Haven, CT.
There are rows and rows of furniture, literally hundreds of pieces of furniture.  I wish it was a lot closer to Ohio, I would be there all the time.  It is about an eight hour drive for me.
Here is the piece that I came to study.


I was able to take out drawers to study their construction as well as the internal construction of the chest.


The back was unusual since it was chamfered and fit into a groove.


Drawer sides are 3/8 inch with a 1/32 inch bead, which I have never seen before.


The drawer bottoms of the large drawers have also a ramp which I have never seen before.


So the trip to the Yale Furniture Study was very rewarding.  I now had all of the dimensions that I need to create a material list.
I went to Irion Lumber and purchased a matched set of 4/4 curly cherry with some 17 inch boards, 8/4 curly cherry and 12/4 curly cherry.  The material is outstanding.


Then I went to Groff & Groff Lumber an purchased Eastern White Pine  for all of the secondary wood. There is quite a bit in the drawers, drawer bottoms, drawer runners, chest back, etc.


Now I have most everything that I need to get started on the high chest.  I think I will start on the four legs and the ball and claw feet.

Here is today's video:


Wednesday, June 1, 2016

Cherry Chippendale Handkerchief Table - Finishing and Complete - Part 8

I am in the home stretch now with just attaching the top, sanding and finishing the table.

Most amateur woodworkers dread the finishing because it is the last chance to screw up the whole project.  This is true for most of us because we don't get enough practice finishing.

Once I made a chair and put a water based dye on it which turned out terrible, it was so bad that I bleached the color off and started all over again.  It was a learning experience as was this table.

First I attached the table top and removed it for finishing, that way it could be easily attached when it was completed.
I made glue blocks and glued them to the inside of the table base.  I put counter sunk holes in the blocks which were larger than the screws.  This will leave some room for the top to expand and contract to help avoid cracking.


 Now that the construction is complete. I sanded everything to 180 grit and then wet down the table with warm water to raise the grain.  Then I sanded off the fuzzies  with 220 grit sand paper.

Then I applied 2 coats of Charles Neil's pre-color conditioner.  This reduces the blotching of the dye.


Then I applied a water based dye and let it dry. It was too dark, so I took a wet rag and wiped down the table until I got the color that I wanted.  Since it is water based, by applying water it kept getting lighter.  The challenge was to get an even color.

Here is how it looked after applying one coat of Waterlox.  The color balance of the photo could be better.


This photo is after three coats of Waterlox and the color is looking much better.  I can only apply one coat per day.  So this process takes awhile.


Here I am sanding between each coat.  I remove the dust nubs from the finish each day with 600 grit sand paper. I use it dry at this point.   Very lightly sand.  I use 0000 steel wool on the curved surfaces like the ball & claw feet.


Applying the next coat with a rag.  I apply just thin coats of finish, that way it does not run or pool on the surface.


There we have it after 8 coats.  It is a bit too shiny now.  I will have to wait for the finish to cure about a week. Then rub it out is 600 grit wet sand paper on the flat surfaces and 0000 steel wool on the curved.  Then a coat of wax and it will be complete.


Now to start planning for the next project.
Here is today's video:


Monday, May 23, 2016

Cherry Chippendale Handkerchief Table - Edge Moulding & Baby Butt - Part 7

Now that I have cut out the top into two triangles, it is time to apply the table edge detail. This edge is essentially an ogee and round over.  I used a piece of scrap cherry here to practice making the cove and round over.


I have made this profile before on a low boy.  So I set up with what I can remember about how to make the profile.

I used a router with a core box bit to cut the cove shape.  I did this in 3 passes, taking a little off each time.


First pass on the 2 edges.


Now for the 1/4 inch round over on the bottom.


This is how it looks after routing.  Pretty close to the lines.  Needs to take a little off the bottom and top round over with hand planes.


I use my 1/4 inch hollow plane to round over the inside of the cove. I am taking a very light shaving.
Notice that I am planing with the grain of the board.


Now it is time to add the baby butt corners.  These are carved on the four corners.   The two that are in the table joint are more difficult because the center is not symmetrical.  One side overlaps the other by 3/16 of an inch.  I made a practice carving on the cut offs.  This one looks good enough to reproduce.  So I made a paper template of the carving.


I traced the carving on to the good table top.  I used a jig saw to cut the curves from the bottom.  The top curves must be carved.


Before I carved the baby butt corners I installed the hinges so that the two halves of the top would be in the exact position they would ultimately be before I did the carving.
I laid out were I wanted the hinges and used a marking knife to scribe the lines.  The hinge barrels are set in a groove so that they are not seen.
I purchased these drop leaf hinges from Horton Brasses.


I used my routing plane to cut out the hinge mortise.  Then I used a 1/4 inch chisel to create the groove for the hinge barrel.


Here they are installed but the joint is a little tight. So I need to plane of the corners of the joint so that it fits better.


Here is how it will hang on the table when closed.


Swing it open and it is still a little tight.


I need to take more off on the corners on the inside of this joint.  When I take it apart for finishing it will be easier to get at.


Now to carve the baby butt corners.  I carved corners on the ends without the joint, these are much easier since they are symmetrical.  Here is a link to a video I made on how to carve a baby butt corner.


After carving the baby butt corners I am ready to try the fit on the table frame.  Looks pretty good on the base.


I open the swing leg and try it with the top open.


I works pretty good but the table rocks. I need to adjust the hinge so that the leg sits flat when open.


So now I am ready for finishing.

Here is today's video:


Monday, May 16, 2016

Cherry Chippendale Handkerchief Table - Pegs & Table Top Part 6

I have started to work on adding the pegs to the joints in the table base.  First I had to make some stock for the pegs.  I milled a piece to scrap cherry to about a 1/64 over a 1/4 inch thick, it was about 12 inches long.

I used my small parts ripping jig to rip them into 1/4 inch strips. This is a safe way to rip small thin strips.


You can see one of the thin strips in the lower left on the saw table top.  As I got close to the blade I used a push stick to hold the material down.


I made this dowel jig out of a block of wood and a spoke shave blade.  I drilled a 1/4 hole and flared the hole at the beginning.  The hole is drilled right on the edge of the block just exposing a little of the opening.   You can see a larger 3/4 inch hole I had used before.


I whittled the end of the square rod to a point to start the dowel, then I put it in the drill and pushed it into the jig.  Just like an old fashion pencil sharpener the square rod gets round.


Checking the diameter with a mic. they are pretty close.


Then I cut them up into 1 1/8 inch pegs.  Used the same 1/4 inch drill bit to drill the holes in the joints.


I put a little glue on the end of the peg and drove it in with a hammer.


After the glue dried, I trimmed them with my flushed cut saw and then used a paring chisel to get them flush.


The base is complete, now to work on the top.

I had purchased some 18 inch wide cherry boards from Groff & Groff, so that each half of the table would be out of one piece.  The base of the triangle is 33 inches and the height if 16 3/4 inches.

I am using an old wooden jointer plane to take the cup out of the board.


Using a straight edge to check the board for flatness


I have removed the cup from the board but it has some twist, which means it rocks when turned over on a flat surface.  I put it on my table saw top and scribed a line on the side where the high spots where.
I am using my jack plane to lower the high corners and feather them back to the center.


I finally get it flat on one side and then used my wide belt sander to flatten and thickness the other side.


Now to layout the handkerchief design. The two boards are from the same tree so I could book match the grain.


Now I need to make the cuts. This could be done by hand or table saw with a jig.  I have an old radial arm saw which will work well for this cut.

I just lower the saw into the cut and pull it across the 45 degree angle.  I finished the cut with a hand saw since the radial arm isn't long enough to cut the complete length.


So now I have the table top, the next step is to put the ogee molded edge around the perimeter of the top.  I will start there in the next post.

Here is today's video: