Search This Blog

Tuesday, April 26, 2016

Cherry Chippendale Handkerchief Table Swing Leg & Glue Up Part 4

I have been busy this past week working on the table.  One of the more complicated pieces of joinery in this table is the rear swing leg.

It is constructed out of four pieces and the leg.

There is a rear backer board made from soft maple but it could be other wood as well.  There are no tenons or fasteners on the backer board. It is held in place by gluing it to the front cherry swing arm pieces.

The cherry swing arm is made of three pieces.  These are shown below.  The first one is a short piece which is tenoned to the left leg and glued to the backer board and contains one half of the knuckle joint.  The short piece on the right is tenoned into the right leg and glued to the backer board.
The middle swing arm has the other half of the knuckle joint and is tenoned into the swing leg.
Lots of work and fitting here.


There are the first two sections and will be the knuckle joint.


Rounding over the swing arm for the knuckle joint using a hollow plane that I made a few years ago.
This is a 5/8 inch radius.  I have a small piece of cherry there as a backer so I don't tear out the edge as I plane the curve.


Laying out the hinge or knuckle joint now. Short end has two fingers, long end has the three fingers.


Saw on the waste side of the line, like cutting out dovetails.


Then chop them out, similar to chopping out dovetails.
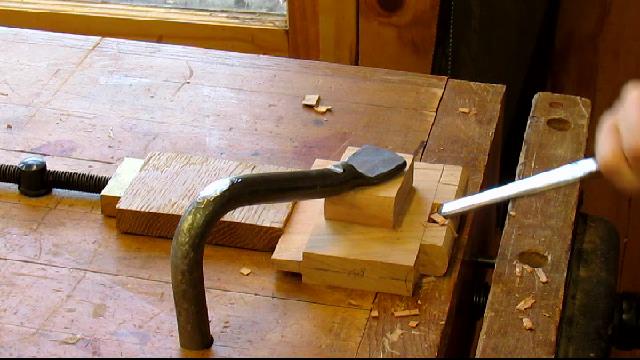

I use a carving chisel to cut the curve for the hinge knuckles. I am using a #5 one inch wide which fits the curve.  Doing the ends is easy, for the middle that will take a bit of work.


Using a depth gauge to check how deep I have to go.  And then using a #3 and carving side to side to create the curve in the center opening. Takes a bit of work cutting across the grain.


Once the knuckles fit together, I drill a 1/4 inch hole offset from the center of the radius so that some of the knuckles stick out the back.  These I will shave off so that the swing arm will only open to 45 degrees.
I drilled from both sides since the drill bit does not go all the way through.  Don't use a long drill bit because they wander too much.


Below you can see how the sections line up.


I drove a 1/4 inch bolt as the hinge pin into the knuckle joint.  I may use wood later but the metal is easier for now since I will remove it for assembling the table.


With the band saw,  I cut out the back half of the swing leg so it will fit flush against the backer board.


I use a clamp to hold the backer piece in place and slip the tenon into the mortise on the leg.


I fitted the small piece of cherry to finish off the joinery for the rear swing leg. I leave about 1/16 inch between the swing and filler piece


I trace the pattern on the sides of the apron and then band saw out the curves.


Glue up of the base with Old Brown Hide Glue using strap clamps to hold it together until the glue dries.


Next chapter will be the shaping of the two rear corners and knee blocks

Here is today's video:


Monday, April 18, 2016

Cherry Chippendale Handkerchief Table Aprons & Mortises Part 3

Finally an update on the progress of the handkerchief table build.  I have been traveling. Chicago for a wedding and east to the Winterthur Furniture Forum in Delaware.   Great couple of days there and always informative.

I did complete carving the ball and claw on the 4 legs that I need.


On my way back from Winterthur I stopped at Groff and Groff Lumber in Quarryville, PA.  and purchased some 18 inch wide cherry boards for the top of the table.  These were 2 consecutive boards so the grain would match on both boards.

I don't have an 18 inch wide jointer so I will have to hand plane one side flat.  I am using an old reconditioned wooden jointer that I won last year from Old School Tools in the UK.


A little bit of hand work here and the board starts to reveal the color and grain. Looks like a good board and now I need to plane the other one.


Here are the two boards together. I have marked out the two triangles that will make up the top.  I have selected an area on the two boards that will mirror the grain pattern on both boards.  Should be a good looking top.


Since I now know were the  top is going to be on the boards I can use the rest for the aprons and swing leg that I need to make. So I cut off a 3 foot section of the board to be used for that material. This way the entire table will be made from the same material. Except the legs.


The two front aprons are 5 1/2 inches wide and are tenoned on one end at 3/4 inch.  The other end is about 1 1/2 tenon with a 45 degree shoulder.  A bit tricky.  I used my tenoning jig on the table saw to cut most of them.


Using the table saw here with the blade set at 45 degrees to saw most of the 45 degree shoulders.


Clean up with hand saw and chisels.


I select the front leg and put the simple 3/4 inch by 5/16 inch mortises in the leg for the aprons.


I use my hollow chisel mortiser but they could be done by hand. I saved the band saw cut offs from when I cut out the cabriolet legs so I could easily square up the legs.


Now things get real tricky. The rear two legs need angled mortises at 45 degrees. These are cut exactly on the edge of the back corner.


I had to make a V block to hold the leg at the correct angle and make sure that it was perpendicular to the chisel.  This could be done with a drill press as well. I also taped on the cut offs from the band sawing to square  up the legs.  This is why I did not cut the mortises before that legs were cut out.


Carefully cutting the mortises along  that edge about 1 1/2 inches deep.


Cleaning up with a chisel, they came out pretty good.  If I had messed up I would have had to remake the leg and carve another ball and claw.


Dry fitting the table base.


You can see where that angled mortise is located and why it is so important that it be as perfect as you can get it.


This rear piece of soft maple is not fastened to the legs, it is just held in by that strap clamp for now.  The joinery here is odd.

The hinge piece will be tenoned to the leg and glued to this back piece which will hold it in place.


A small piece with a tenon will be used on the other end to hold the back piece in place.  Then the swing leg will be attached to the swing arm.  Much hand work and fitting to be done here.


Looking from the front you can see that there is a lot of shaping to be done on the tops of the rear legs and knees to get them to be the correct shape around the corners.  This will be done after it is glued up.
Also the aprons need to be cut out with the pattern before glue up.

The front leg knee blocks will be the simple ones.


So for now I am going to work on the wood hinge and swing arm joinery in the back.  Get that to fit together and then cut out the pattern on the aprons.  That will be in the next post.

Here is today's video:


Thursday, March 17, 2016

Making a Cherry Chippendale Handkerchief Table - Carving Ball & Claw - Part 2

I have decided to carve the ball and claw feet on the legs next.  This is a little dangerous since I have not cut the mortises in the top of the legs yet.  Hope I don't screw it up after carving the ball and claw feet.

I have videos on youtube with time-lapse photos of carving the whole ball and claw if you want to watch them.  In this post I will just high light the steps.

I learned to carve the ball and claw from Mary May. If you really want to learn to carve a ball and claw take a lesson from her.    She has a plan which includes step by step pictures and tips on carving each step.  I follow her plan every time I carve one of these.


I layout the foot following her instructions but I have to reduce the sizes by an 1/8 inch since the foot for this table is 2 5/8 instead of the 2 3/4 inch on most feet.


This first step after layout is to carve a cylinder to the first circle line on the bottom.  Below is a picture of the first side being rounded over.  I am using a  1/2 inch flat chisel or a  1/2 inch #3
I set the lines in using a v chisel to start.


Below shows all 4 sides rounded over to a cylinder.


Using the square I check to see that the cylinder sides are flat and square to the bottom.


Now the feet or toes need to be trimmed back to the layout lines.


The next step is to find the center of the ball which about 7/8 inch from the bottom and round over the lower part of the ball to the second circle on the bottom of the foot.
Below I have rounded over the lower half of the first side using the plaster cast as a guide.


I can check the curve by using a molding gauge, I copy the curve from the plaster cast and match the carved ball. This helps me but most carvers wouldn't need it.


After rounding over the 4 lower areas of the ball, round over the top section of the ball. I am using a flat chisel or a #3 to do the carving.  Again I use my molding gauge to check the curve of the entire ball.


After carving the top sections of the ball, I work on creating the web.  I free hand the lines on leg to create a v shape while keeping the size of the toes equal all the way up.  I use a #7 or #8 to carve out the web.


This area of the foot is easier to carve if you have a spoon gouge but it can be done with out.


Now I start to round over the toes and create the talons.  You can exercise you artistic talent here and shape them to create different moods.  I use a flat, #5 and #3 to form the toes and talons.


I usually adjust the height of the knuckles to a little lower, I don't like them to stick out too much.


With the last toe carved I need to clean up the rough carving marks and blend it in to the upper part of the leg.


Here is the ball and claw after I have cleaned up the rough spots with files and blended it into the leg.
It would still need to be sanded.


Only 3 more to do.  I had better get  busy.

Here is today's video:


Wednesday, March 9, 2016

Making a Cherry Chippendale Handkerchief Table - Part 1

I have started a new project.  I found this table in the SAPFM members gallery and the prices4antiques.com data base.


As it turns out it is also in Norman Vandal's book Queen Anne Furniture, Norman received permission from Gene Landon to publish Gene's design from a 1985 Fine Woodworking article on making the Queen Anne Handkerchief table.

The original has pad feet but later Chippendale style tables had ball and claw feet. So that is what I am going to build from cherry.

I started by assembling my references, Norman's book, the Fine Woodworking article and the photo from the antiques data base.


I was able to blow up the drawings from Norman's book to full size, so I did not have to make my own full size drawings.


I started with the leg drawing and modified it to include the material for a ball and claw foot.  This leg and foot was almost identical to the leg and foot I used to make the Turret Top Tea Table in an earlier post here and on Youtube.


I had 4 leg blanks in cherry that had been sitting around my wood storage for years, so that helped influence my decision to make it from cherry.  These rough sawn where slightly under 3 inches but were quite a bit out of square.  They needed a lot of work to get square at 2 5/8 inches.


All squared up and marked with the pattern.  The extra material at the top will be cut off and used for the knee blocks.


Now for the band sawing of the cabriolet legs.  The pattern is applied on two adjacent sides. You cut out one, then tape it back together and cut out the other side.


Cutting out the second side after taping it back together.


Cut out legs and lots of clean up to do.


I have a number of Youtube videos which show clean up of cabriolet legs using a round bottom spokeshave, rasp and files.  The rasp and spokeshave remove the bandsaw bumps and get a nice smooth line to the shape of the leg.


Here I am using a number 50 Nicholson rasp to round over the sharp corners of the leg. The ankle of the leg is just about round at 1 inch.


Here I am using an almond shaped fine file to remove the tool marks from the rasp.


One done, looks pretty good.  I will carve the ball and claw now on this leg and then repeat the process on the other three legs.  This allows me to break up the tasks to keep it interesting, not the most efficient way but it keeps me out of the saloons.


Here is today's video: