I used my small parts ripping jig to rip them into 1/4 inch strips. This is a safe way to rip small thin strips.
You can see one of the thin strips in the lower left on the saw table top. As I got close to the blade I used a push stick to hold the material down.
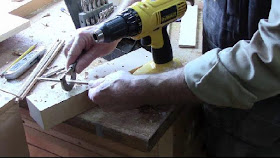
I made this dowel jig out of a block of wood and a spoke shave blade. I drilled a 1/4 hole and flared the hole at the beginning. The hole is drilled right on the edge of the block just exposing a little of the opening. You can see a larger 3/4 inch hole I had used before.
I whittled the end of the square rod to a point to start the dowel, then I put it in the drill and pushed it into the jig. Just like an old fashion pencil sharpener the square rod gets round.
Checking the diameter with a mic. they are pretty close.
Then I cut them up into 1 1/8 inch pegs. Used the same 1/4 inch drill bit to drill the holes in the joints.
I put a little glue on the end of the peg and drove it in with a hammer.
After the glue dried, I trimmed them with my flushed cut saw and then used a paring chisel to get them flush.
The base is complete, now to work on the top.
I had purchased some 18 inch wide cherry boards from Groff & Groff, so that each half of the table would be out of one piece. The base of the triangle is 33 inches and the height if 16 3/4 inches.
I am using an old wooden jointer plane to take the cup out of the board.
Using a straight edge to check the board for flatness
I have removed the cup from the board but it has some twist, which means it rocks when turned over on a flat surface. I put it on my table saw top and scribed a line on the side where the high spots where.
I am using my jack plane to lower the high corners and feather them back to the center.
I finally get it flat on one side and then used my wide belt sander to flatten and thickness the other side.
Now to layout the handkerchief design. The two boards are from the same tree so I could book match the grain.
Now I need to make the cuts. This could be done by hand or table saw with a jig. I have an old radial arm saw which will work well for this cut.
I just lower the saw into the cut and pull it across the 45 degree angle. I finished the cut with a hand saw since the radial arm isn't long enough to cut the complete length.
So now I have the table top, the next step is to put the ogee molded edge around the perimeter of the top. I will start there in the next post.


No comments:
Post a Comment